
How to knit a star on five needles in one evening. A master class on New Year's decorations will teach you how to knit a crocheted star for a Christmas tree. Crochet star pattern.
The perception of a crocheted star pattern largely depends on your mood, as well as the color of the finished product and the thickness of the threads. Some may resemble stars, may appear like snowflakes, or evoke associations with flowers - in any case, the effectiveness and simplicity of this pattern have long made it one of the most popular. To crochet a star pattern, no special skills are required: most of the existing patterns are easy to make. This pattern is universal - it can be used for knitting sweaters, dresses, hats, scarves, mittens or blankets.
A warm scarf
To get acquainted with this technique, you can knit a simple scarf, each star on which will be formed from six lush columns.
Lush columns are usually understood as a bunch of different numbers of unknitted columns, which are knitted from one common loop and also connected in a common loop. This element is knitted as follows:
- first of all, you need to knit a warp chain, then several lifting air loops - their number will determine the height of the lush column;
- then yarn over the hook and insert it into one of the warp loops. Which one depends on the pattern; the number of loops skipped from the beginning of the product will determine the width of the element;
- then through the warp loop you need to pull the working thread - to a height equal to the height of the connected lifting threads;
- The alternation of yarn overs and long loops must be continued until the amount corresponding to the width of the column is collected on the hook;
- Such columns are connected in various ways, the simplest and most often used is a regular air loop, which is knitted after the thread has been pulled through the cast-on column.
In the master class and description below, each star will consist of six such columns.
Pattern diagram:

For the base, you should knit a series of air loops. Pattern repeat - two rows. In the first row four lifting loops are knitted. Then, through the third loop of the base, three lush columns should be knitted. At the next stage, you need to knit three more air loops and one fluffy column into a loop that connects the first three. The loops of this column must be left on the hook, knit two more (one in the third, and the second in the seventh loop of the warp), and then connect all the threads that are on the hook. Similarly, knitting continues throughout the entire row.

In the second, the center of the stars shifts: after the same rise, the row should begin with three air loops, followed by four air columns. One of them is knitted in the fourth lifting loop, the second - in the column of the first row with two crochets, the third - in the middle of the star.
Circular option
The option of knitting a star pattern in the round is also quite simple, which is convenient to use for creating a hat or snood. It is also formed by lush stitches, only the knitting order differs. You should start knitting with two air loops. Then a lush column is knitted into the first of them, which is connected with an air loop, knit another air loop. It is necessary to make a chain of the required number of such columns, the last one is connected by an air loop on a thread stretched through the column and the very first air loop. Then a rise stitch is knitted into the same loop. You need to knit one stitch into the loop that connects it, but do not tie it at the top. Another unknitted stitch is knitted into a loop through which the first row is joined into a ring, the third stitch is knitted into the adjacent left loop of the first row. Thus, the hook should have rolls and long loops, the number of which will correspond to three stitches. Only after this can they be connected to each other with a loop.
At this stage, half an asterisk is formed in the second row, the working thread is in its center. On the hook you need to re-cast the loops of three stitches that are not connected at the top. One is knitted in the center of the star, the second - in the loop of the first row, through which three stitches are already knitted, the third - in the adjacent left one. The columns are again connected to each other. The entire row is knitted in this way.

The last star in this row should be attached to the top loop of the column that formed the rise. Therefore, when knitting it, you need to cast on loops for only two bundles, and then connect them with the corresponding loop.
If knitting with stars is used for a hat or beret, decreases must be made in the top rows to preserve the beauty of the pattern. To do this, after the lifting column, loops for two bundles are cast on through two corresponding loops (the center of the star being formed and the bottom loop), and for the third, a decrease occurs: one thread is pulled out through the corresponding loop (the first to the left of the bottom), two more through the adjacent left one. Thus, the pattern element is slightly shifted to the left. The next star is knitted as usual; the decrease should be made through one element of the pattern.
“Correct” Christmas tree decorations are a separate world into which you want to dive, like into ocean waters somewhere on the shore with golden sand: dive, swim, dive and not emerge. These are the toys with which you want to sit at the table, telling family stories and legends, remembering your loved ones, laughing at the interesting events that took place last New Year and feeling real happiness. And yes, of course, we are talking mainly about handmade New Year's toys- those in which the master puts a piece of his soul, which are created with History, which are filled with love. In general, let's crochet a star- let this be a project for the current year: you decorate it with a Christmas tree toy, decorate the Christmas tree with it, and years and decades later you will tell your grandchildren how you made this particular toy and what you wanted to say.
Knitted star- it's simple and exciting. Are we doing?
How to crochet a star - 5 master classes:
1. Christmas tree-stocking for gifts

Look what a cool idea! On one side is a Christmas tree toy. Simple, elegant and quite thematic: a beautiful star for the Christmas tree. On the other hand, this is an excellent storage for surprises: having given, for example, such a toy to a child, you can say that it is magical and prove it by putting a piece of candy or a tangerine inside every night.
2. Simple five-pointed star

You don’t always need to invent something unusual or catchy; sometimes it’s enough to just do something classic and standard, but do it with love and soul - that’s when the best things possible come out! The proposed pattern is accessible and suitable even for those who are just starting to get acquainted with crochet.
3. Patchwork star

Patchwork is traditionally a “sewing” technique, however, its principles can also be implemented in the context of crocheting, and the result is delightful and so infectious that it is then difficult to stop: you want to knit something similar again and again, again and again. In general, when making a decision in favor of this star, be aware of the consequences.
4. Eight-pointed star

An option for those who love everything unusual and non-standard. Such a Christmas tree toy first of all catches the eye with its shape - these are not the classic five rays, but eight at once, moreover, they are not the same in size, which attracts attention even more. Well, and besides, there is an interesting ornament in the center.
We will need orange Baby Vita yarn (100% acrylic, 100 g, 400 m), sock knitting needles (7 pieces), a needle with a large eye for sewing parts and padding polyester or other filler. We cast on the knitting needles 108 loops. 1 row. 108 p. 2 row. Divide into six sock needles of 18 loops each.  We knit 7 knit stitches (kl), then pull through. First, we remove two loops on the right knitting needle, placing the knitting needle under them on the left.
  And we knit the next one after them, like the front one.
  Then we pull this knit stitch through two loops.
  And leave it on the right knitting needle.
  In this way, the number of loops is reduced by two, and along the entire row - by 12. A beautiful convex braid will be formed at the place of broaching; it will be in the middle of the ray of the star. After stretching, we knit another 7 stitches and the last 1 purl loop (sp). 3rd row. 6 lp, broach, 6 lp, 1 ip.
 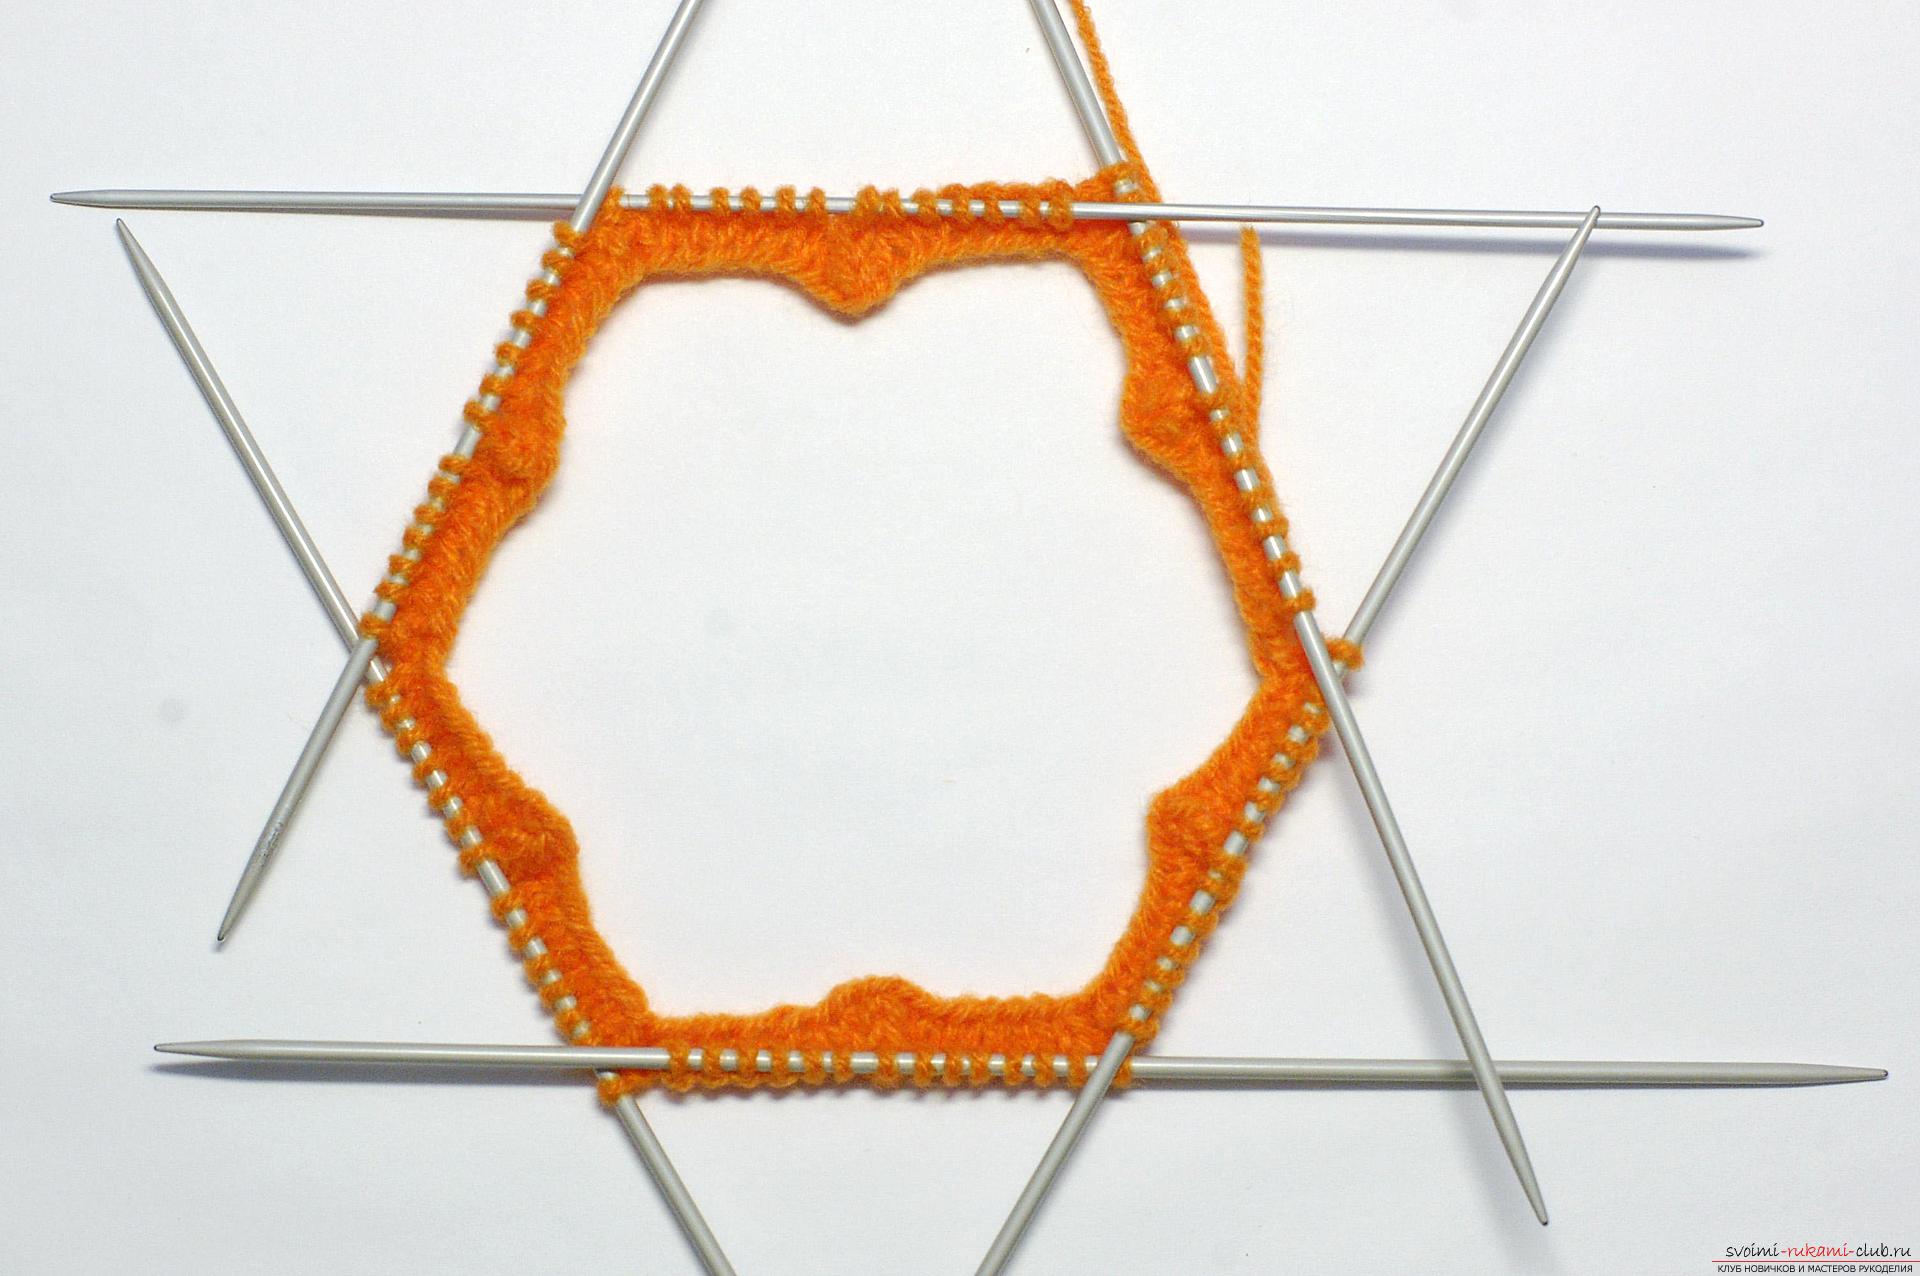 4 row. 5 lp, broach, 5 lp, 1 ip.
  5 row. 4 lp, broach, 4 lp, 1 ip.
  6th row. 3 lp, broach, 3 lp, 1 ip.
  7th row. 2 lp, broach, 2 lp, 1 ip.
  8 row. 1 lp, broach, 1 lp, 1 ip.
 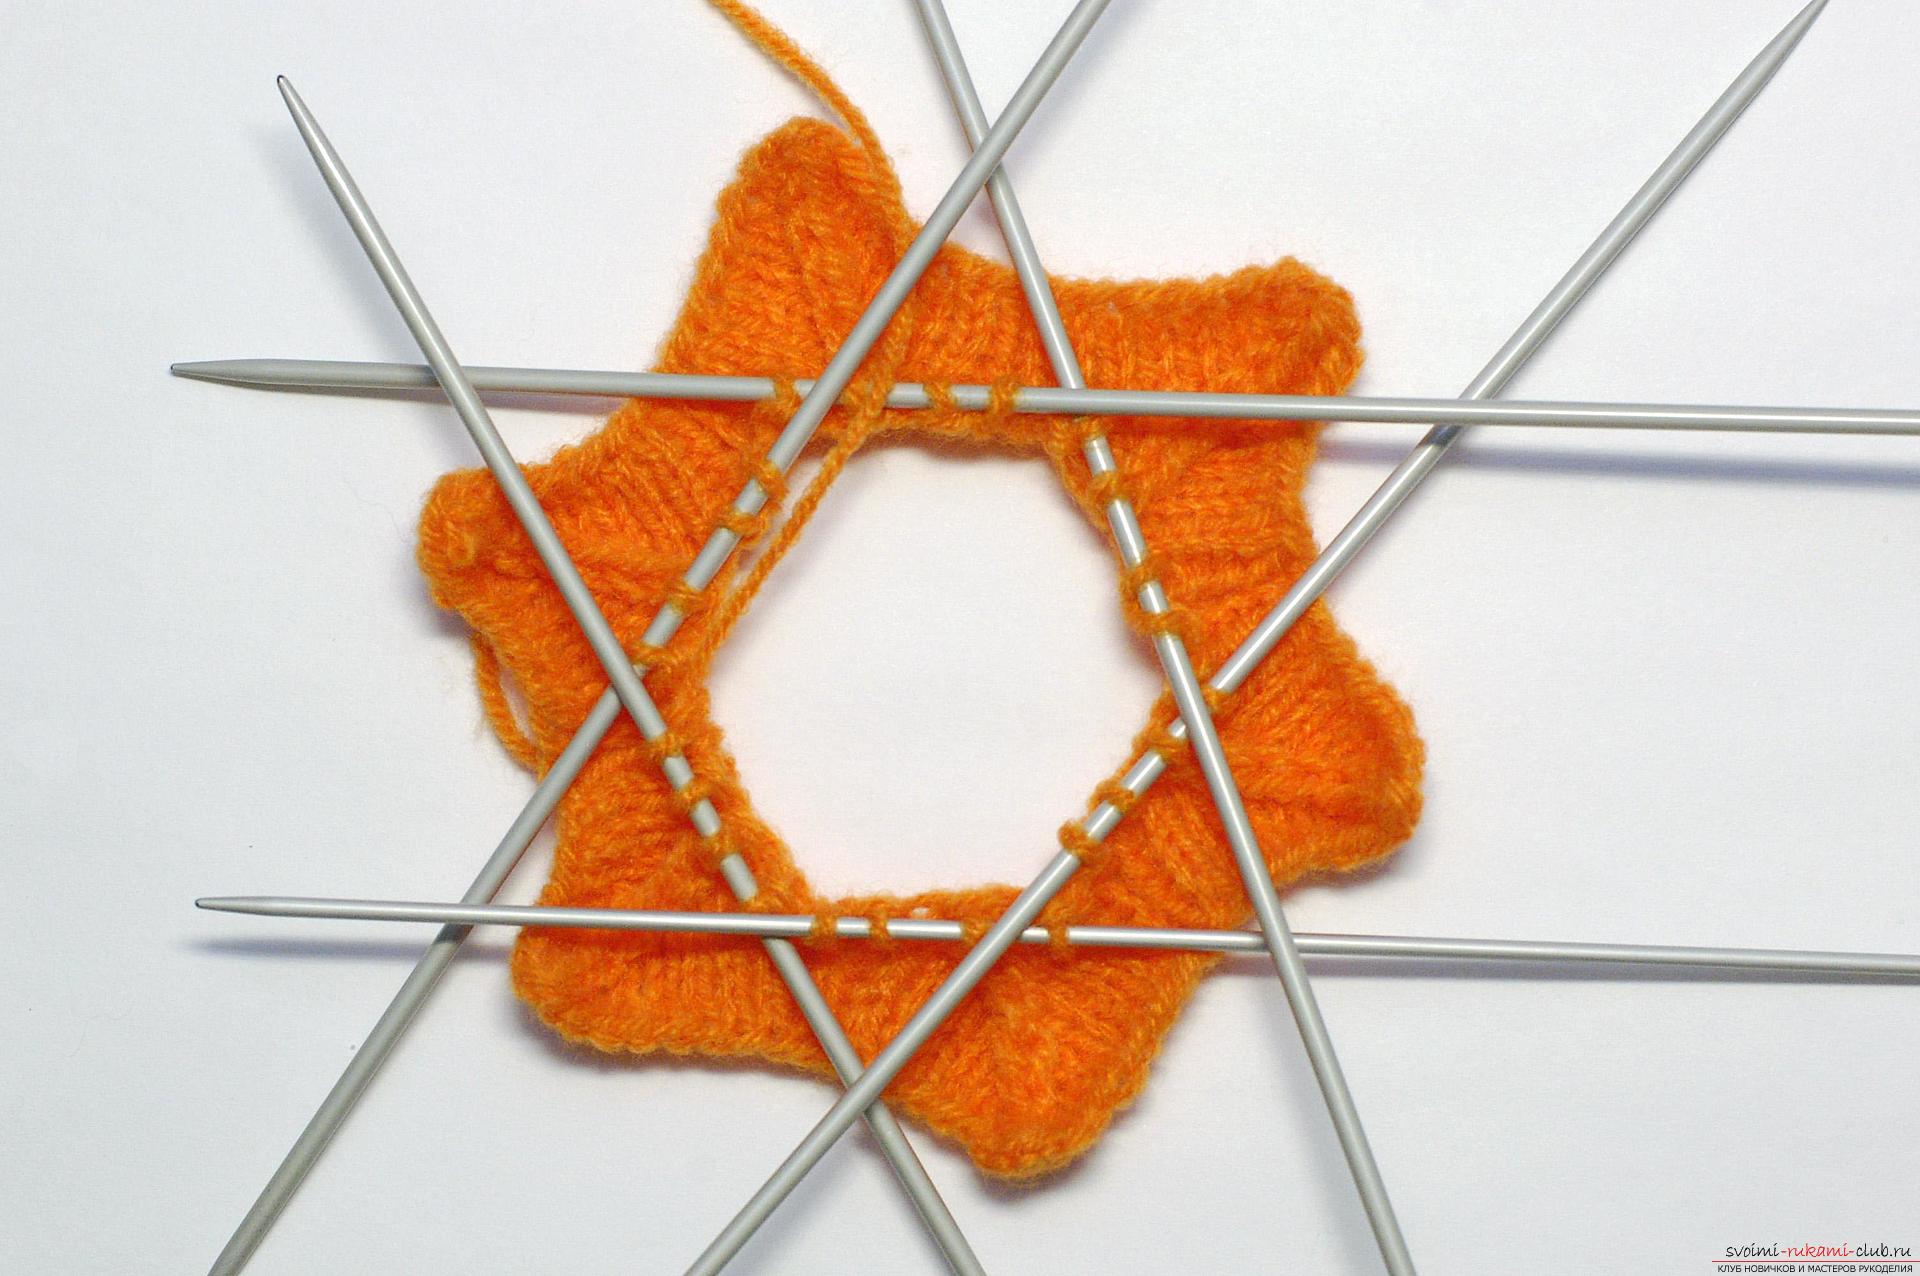 9 row. We put the knitting needle on the left by the first two loops, remove them to the right, knit the next one, pull it through the first two and knit the last one as a purl. There are only two loops left on the knitting needle - pull through and purl. To prevent the knitting needles from jumping out of the knitting, we distribute it into three.
  10 row. We knit two loops into one knit stitch.
  11 row. Two loops in 1 loop.
  We tighten the remaining loops in the middle and hide the end inside. Let's knit another such piece, sew them together using a needle with a large eye and fill it lightly with padding polyester.
  From the thread left over from sewing, we will raise a chain of air loops and make a loop from it into which you can insert a ribbon.
  You can use the ribbon to hang our star on the Christmas tree. Happy New Year and Merry Christmas!
Comments
Related posts:
The master class will teach you how to crochet a New Year's craft - a knitted garland for a Christmas tree A step-by-step master class will teach you how to crochet a knitted crown for a girl The master class will teach you how to crochet a New Year's craft - a knitted Christmas tree toy
A crocheted star is a simple product to make, but at the same time an interesting and versatile item. In the shape of a star, you can make a soft toy for your baby, a napkin for a table or a rug for the floor, a blanket, a Christmas tree decoration and a huge number of other options. Thus, by spending very little time and effort, you can create a beautiful and useful masterpiece with your own hands.
Christmas tree decoration “Star”
A bright star, crocheted from motifs of different colors, will be a worthy decoration for a New Year's beauty. When it rotates, its edges change colors. If the lower edges are not connected, then the star can be placed on the top of the tree, where it will become the main decoration.
So let's get started. For work we will need:
- some mercerized cotton yarn in three colors;
- remnants of white or silver yarn for binding;
- hook No. 2.
First we need to connect 3 motives according to the scheme.
And then starch them to keep their shape.
Fold the motifs and tie their edges with white thread in a single crochet.
At the top, knit a chain of air loops and close it into a loop.
The decoration is ready.
New Year's star: video MK for beginners
Soft crochet starfish
A voluminous soft crocheted star can serve as a baby toy, an interior item, or a needle case for a needlewoman.
For work need to prepare:
- remains of blue yarn;
- hook with the corresponding number;
- filler.
We need to connect two circles. To do this, crochet 2 air loops, and then:
1r. – 6 tbsp. b/n in the second loop, (6);
2 rub. – perform an increase 6 times, (12);
3 rub. – repeat the pattern 6 times (1 tbsp + increase), (18);
4r. – 6 times (increase + 2 tbsp. b/n), (24);
5 rub. – 6 times (3 tbsp. b/n + nailing), (30).
In the first circle, the working thread needs to be secured and cut, and with the thread of the second circle we continue knitting.
Now let's move on to knitting the rays. To do this, in the first row in the second circle we perform 7 tbsp. b/n, after which we make 7 tbsp in the first circle. b/n, (14)
In the second row from 1 loop in the second circle - 5 tbsp. b/n, decrease, 5 tbsp. b/n, decrease, (12)
3 rub. - decrease, 4 tbsp. b/n, decrease, 4 tbsp. b/n, (10);
4r. – 3 tbsp. b/n, decrease, 3 tbsp. b/n, decrease, (8);
5 rub. – decrease, 2 tbsp. b/n, decrease, 2 tbsp. b/n, (6).
Fasten and cut the working thread and pull the loops together.
We attach a thread to the outer loop of the previous ray of the first circle
And then we knit in the second round
14th Art. we do it without attaching the thread.
We also knit the remaining rays - constantly capturing the outer loops of the previous ray. When knitting the latter, we grab the outer loops of adjacent rays
The shape and length of the rays can be adjusted. For example, if you decrease every other row, they will be narrower and longer, and if there are 4 decreases in a row, they will be short and plump.
Master class on crocheting pillows in the shape of a star
A gentle and soft star will be a worthy interior decoration in your home, or will become an original gift for friends and family. Knitting a pillow is not difficult; even novice needlewomen can easily cope with this task.
What we will need:
- finished fabric yarn;
- suitable hook;
- quilt scraps/felt/felt;
- filler.
For knitting, it is better to use yarn of the same thickness. But if, suddenly, it is thicker for one side and thin for the other, the final size of the finished part will be adjusted by the number of circles. After each row, the yarn should be pulled out so that the fabric is even and does not curl.
So let's get started. We start knitting from the central part of the star.
1r. – cast on 3 ch, make 9 double crochets into it, and then connect (connect with a stitch) and pull it tightly until completely closed.
2 rub. – cast on 3 ch again, make 2 double crochets in the next loop and continue doing 2 dc in each loop. At the end of the row we make 1 dc in the next row. loop and connecting column in the 3rd ch.
3 rub. – 3 ch, 9*(1 dc in next p, 2 dc in next p). Next, 1 dc in the next stitch, 1 dc in the last loop. We finish the row with a column in the 3rd initial ch.
4r. – 3 ch, 9*(1dc in next 2p, 2 dc in next). Then, 1 dc in the next. 2p, 1 dc in last p. Finish the row of connections. Art. in the 3rd initial ch.
5 rub. – 3 ch, 9*(1 dc in next 3p, 2 dc in next p). 1 dc in next. 3p., 1 dc in the last one. n. Connect st to 3rd initial v.p.
6r. – 3 ch, 9*(1 dc in next 4p, 2 dc in next p). 1 dc in next. 4p, 1 dc in last p. Connect st into the 3rd initial vp.
We do not cut the working thread.
Let's move on to crocheting the first ray.
1r. – do 3 ch. from the end of the 6th row. Then - 1 column. with nak. in the next 11 stitches. We unwrap the product.
2 rub. – we carry out the connection. Art. in the 2nd loop from the hook and 3 ch. Next - 1 column. with nak. in next 9 stitches. We unfold the product again.
3 rub. – connection art. in the 2nd loop from the hook + 3 ch. 1 column with nak. in next 7 stitches. Turn.
4r. – connection art. in the 2nd loop + 3 ch. Then, 1 pillar. with nak. in next 5 stitches. Rotate the canvas.
5 rub. – conn. Art. in the 2nd loop + 3 ch. Then, 1 column. with nak. in next 3 stitches. Turn the canvas again.
Now let's do the rest of the rays.
1r. – we make a standing connecting post, as shown in the figure, in the next stitch (3 chain stitches) of the previous beam. Then, we perform 2 air reps. and 1 column. with nac in next 11 stitches. We unfold the product.
3 rub. – conn. pillar. in the 2nd pet. from hook 3 air pet. 1 column with nak. next 7 pet. We turn the product again.
4r. – conn. pillar. in the 2nd pet. from hook 3 air pet. 1 column with nak. next 5 pet. Turn.
5 rub. – conn. pillar. in the 2nd pet. from hook 3 air pet. 1 column with nak. next 3 pet. Turn.
6r. – conn. pillar. in the 2nd pet. from hook 3 air pet. 1 column with nak. in the same loop as 3 air. pet. And next. loop - 1 column. with nak. Cut the thread and fasten the end.
Edging. We start with the base of any beam. We make 1 standing connecting joint. Then, 13 connecting stitches are made evenly upward along one side of the beam. 3 air loop 13 connecting rods evenly down the other side of the beam. In this way we tie the remaining rays and connect them to the first connecting post. Fasten the thread, cut it, and hide the tail in the weave.
Assembly. To prevent the filler from “leaking through” the holes in the knitting, we use scraps of a quilted blanket (or felt, felt) as a lining. We cut out stars from the lining material that match our knitted ones in shape and size. The color of the lining should be taken into account; it should not contrast with the yarn. For example, white felt is more suitable for a light thread, and felt is more suitable for a dark thread.
We will connect all the layers in this order - star, lining, lining, star.
We start with any stitch. Make 1 standing joining stitch through 2 inner loops of each stitch
We make 1 such stitch in each loop until one ray remains. Stuff the pillow with filling between 2 layers of lining fabric

In contact with
Classmates
In order for the Christmas tree to become truly New Year's, it must be decorated with crocheted stars.

Knitting a star is quite simple, you just need to know how to knit a double crochet and a single crochet. For knitting you will need any yarn, a hook of the appropriate size, polystyrene foam, film, five basting pins, PVA glue, water. You can vary the size of the star by using yarn of different thicknesses.
Row 1. Knit 10 double crochets (10 dc) into the amigurumi ring.
Row 2. Air lifting loop, knit a single crochet in the same place; (dc, s2n, vp, s2n, dc) in the next column of the previous row; sc; (dc, s2n, vp, s2n, dc) in the next column of the previous row; sc; (dc, s2n, vp, s2n, dc) in the next column of the previous row; sc; (dc, s2n, vp, s2n, dc) in the next column of the previous row; sc; (dc, s2n, ch, s2n, dc) in the next column of the previous row. You should end up with a flower with five petals. Each petal is separated from each other by a single crochet (sc).

Mix PVA glue and water in equal proportions and soak the flower in this mixture. Cover the foam with film, place the flower on it and stretch it in different directions, securing the rays with basting pins.
