
How to make artificial flowers from foamiran. DIY foamiran flowers: master class for beginners, patterns. Foamiran flowers, chamomile, diagrams
A huge advantage of any type of creativity is that the created crafts turn out to be unique, thanks to your imagination. You can create flowers that do not exist in nature, or unprecedented animals according to your own vision. Today we will tell you how to make flowers from Thomas, which can decorate your home or serve as a wonderful gift for friends.


But before you start creating, you need to select the necessary materials for the work.
Materials
- foamiran of different colors (since the flower is a fantasy one, choose the colors at your discretion),
- iron,
- pastel pencils,
- ready-made stamens for flowers,
- floral wire,
- toothpick,
- Polish for hair,
- cardboard,
- paper.
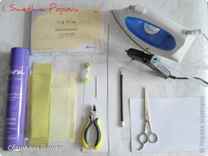
The photo shows a ready-made set for creativity:
DIY foamiran flowers: progress of work
We begin making flowers from foamiran by creating blanks for the petals. To do this, we need to draw patterns on a sheet of cardboard:

Then we cut out the blanks and prepare them for work:

Now we need to transfer the contours of the petals onto foamiran sheets. For this we need a toothpick.


Thanks to its pliable properties, we can easily cut out all the blanks using scissors.
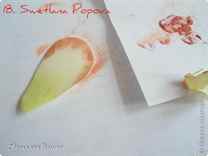
Using a small knife, remove a small amount of shavings from pastel pencils to tint leaves and flower petals:

And carefully paint the base of each petal:

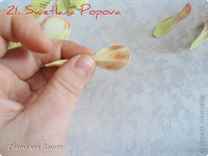
For the tops of the petals we use crayons of other colors:

And also carefully tint the edges:
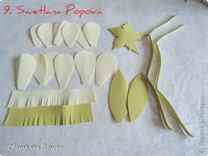
When finished, our blanks look like this:

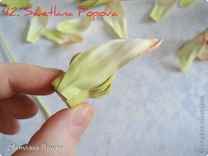
Using the example of the “peony from foamiran” master class, we have already discussed how to add volume and texture to blanks. So we do the same steps:
heat up:
add up:
twist:

We carry out these operations with all workpieces:

By the way, you can draw patterns of petals or other details yourself, thereby giving the flower the shape that you like.
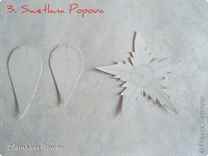
And now we move on to the stamens of the flower.

You can buy such blanks at any craft store. They are often used in ceramic (porcelain) floristry.
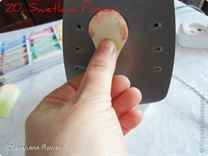
So, we bend 30 stamens in half and fix them with an elastic band or wire.

We wrap the blanks with a strip of foamiran fringe and align the edges of the stamens, thereby cutting off the place of fixation:
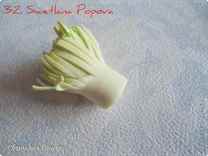

Wrap with a second layer of fringe:

We have the core of the flower ready:

Now we need wire, which we will wrap with strips of foamiran in 2 layers:


We need to make a small knot at the end of the wire:

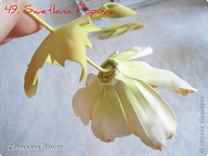
When all the details are ready. We begin gluing the petals. There is no special flower assembly scheme here. Since our model is fantasy, the shape and arrangement of the petals is left only to your discretion.


When all the petals are glued to the core, we attach the wire, smearing the knot at its end with glue:

We make a hole in the flower gluing and string it onto the wire, covering the junction with the core:

Glue using special glue:

The final touches to creating a flower are decorating the stem with petals:
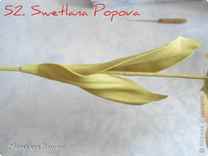
The finished flower must be sprinkled with a small amount of hairspray to fix the color of pastel pencils on the petals: 
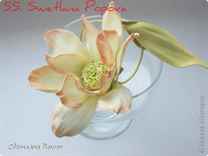
This is how the fantasy flower turned out:

If you have a rich imagination, then you, of course, can create a huge variety of all kinds of flowers that simply cannot be found in nature. I offer you the basic techniques for working with foamiran, taking as a basis those that will make it easier for you to realize your ideas.
Therefore, I offer you a few more video lessons on creating flowers from foamiran.
A selection of video lessons
Foamiran is an artificially produced material that has found wide application in various fields of needlework. Due to its delicate and elastic structure, foamiran is often called plastic suede. Thanks to the large palette of colors and the possibility of tinting, this material can be used for decorating interior items, making jewelry or wedding accessories.
Today, the main producers of fom are China, Türkiye and Korea. Choose plastic suede based on porosity and thickness, depending on the type of work being carried out. In this article we decided to offer you several master classes on making flowers from foamiran with your own hands.

Hydrangea
Materials:
- stamens for flowers;
- foamiran in two shades;
- glue;
- scissors;
- wire;
- pastel.

1. Take foamiran of a suitable color for the future flower. Divide it into equal 2x2cm squares. This can be done using a ruler and a toothpick.

2. Cut the material into squares that will be used to create the petals.
3. Divide each square into 4 parts and make cuts with scissors.
4. The result is squares with petals. The core can be tinted with green pastel.
5. Now these petals need to be heated with an iron and applied to a form with the texture of leaves.

6. After heating with an iron, the petals can be tinted with pink pastel.
7. Insert a stamen into the middle of each flower and collect beautiful inflorescences from 5-6 flowers.
8. Cut out leaves from green foamiran and make cuts on them.

9. We also heat the leaves and give them texture using a mold.
The result is a beautiful sprig of hydrangea that can decorate the interior or be used instead of a boutonniere.
Peony from Thomas step-by-step master class with photos

Peony from foamiran
Materials:
- pastel;
- foamiran;
- iron;
- scissors;
- glue gun

1. Draw petal patterns on a piece of paper and then transfer them to foamiran. You should get 6 types of petals. For one peony you need to cut 10 petals according to the first three templates, 8 petals according to the fourth template, 17 petals according to the fifth and 7 petals according to the sixth.

2. Tint the petals with pink or purple pastels. When tinting, keep in mind that the further the petal is from the center of the flower, the darker it should be.


4. Take a piece of wire and bend the end with pliers. Let's start gluing the petals on this wire clockwise and overlapping.

The result is a neat peony that can be glued to a hoop or hair band, and can also be used for interior decoration. If you use a Turkish fom, the petals will turn out even thinner and more realistic.

You can do absolutely anything yourself foamiran flower. You can use real petals from a wilted flower as a template.
Useful video: Foamiran flower for beginners
The principle of making flowers is quite simple, you need to cut out parts from foamiran, then apply them to the heated surface of the iron and give them shape. After practicing on simple models, in the future you will be able to create real masterpieces from plastic suede.
Foamiran is a modern material that is pleasant to work with. For its excellent characteristics and ability to take any shape, it was nicknamed “rubber paper.” The color palette of foamiran is impressive, and working with it is a pleasure!
Foamiran flowers are distinguished by their realism and absolute similarity to the original plants. Such products are used everywhere: in the interior, for handicrafts, for bright holiday decorations, for creating clothes and jewelry.
Foamiran is an artificial fabric with a structure reminiscent of suede or rubber. It is this feature that allows the products to be as natural and beautiful as possible.
Foamiran in assortment
Making flowers from foamiran yourself is not difficult; it requires standard tools, a diagram and desire.
Fantasy will make your product perfect and unique. Large flowers are the most spectacular and lightest, since they do not require long, painstaking work.
Necessary materials to create a large flower:
- foamiran (three sheets: green, white, pink)
- scissors
- toothpicks
- iron (for shaping)
- chalk pastels
- hot melt adhesive

 pattern for a rose from foamiran
 In principle, the number of petals is not limited, but you must clearly focus on the appearance of your flower so that it is as natural and beautiful as possible.
The petals in this flower are of different sizes. To start attaching to the green base, you need to start with small ones (the middle) and gradually expand towards the edge.
Creating beautiful petals from foamiran:
- draw or print petal templates on a printer
- Place the templates on the material and trace the outlines with a toothpick
- carefully cut the petals from the material with scissors
- heat the iron to medium heat
- place the petal on the iron for a few seconds, this will curl it a little into its natural shape
- You can use a toothpick to draw veins on the petal for naturalness.
- use a fine pink pastel (darker than the material) to rub the edges of the petal to give it volume and brightness
- Attach with hot glue to the cut out base of a green flower
Video: “Foamiran flower”
How to make small flowers from foamiran: diagrams
Small flowers made from foamiran are an excellent product for creating decorative elements, head decorations and even jewelry. Creating flowers does not take much time due to the fact that they are small and do not require heat treatment.

 small roses from foamiran
 Necessary tools for making small roses:
- colored foamiran
- wire
- scissors
- hot glue
Usually, a pattern is not required to make such roses. All petals in a flower are the same size and are cut together.
If you want to make other petals, of a different shape and size, use the template:

 flower petals template made from foamiran
 Making a flower:
- Measure three centimeters on the folded roll of material
- cut a strip of three centimeters
- fold the cut foamiran tape like an accordion several times to the size of two and a half centimeters
- cut the sides of the accordion to get uniform square pieces
- Cut a drop from each square, cutting off the corners evenly
- Attach the petals to the wire one by one using hot glue
- at the end, cut out a green star and glue it to the base of the bud
Video: “Master class on a little rose from foamiran”
DIY flower patterns from foamiran
Just as flowers are varied in the natural environment, they are also varied when made from foamiran. There are many sketches that allow you to create not only roses, but also lilies, crocuses, tulips, poppies and much more.

 basket of flowers made of foamiran
 An orchid made from this particular material turns out to be incredibly beautiful, delicate and feminine. This flower does not require a large number of petals, but it needs to be made as natural as possible by painting with acrylic paints. The petal pattern is the simplest. It can be cut to any size.
 Orchid petals template
 Diligence, hard work and the desire to replicate a living flower as much as possible will help you create a real work of handicraft art. The veins on the petal can be made with a special stamp, or they can be done by gently pressing a toothpick.
 white orchid from foamiran
 It is easy and simple to create a lily from foamiran, because it is a fairly simple large flower. To do this, you will need to use a template of petals that follow the curves of a real plant:
 lily petals pattern
 The core of the lily can be purchased ready-made along with the material itself. Applying it to a not too hot iron will help make the petals look natural.
The material bends and takes any shape you give it. It will be necessary to make several veins with a toothpick and make colored dots with bright acrylic paints.
Video: “Orchid from foamiran, master class”
How to make wildflowers from foamiran: master class
Wildflowers are the favorites of many women. They become a wonderful decoration if they are made of high-quality foamiran. Such compositions can easily be made on decorative headbands and hair clips, create frames and decorate your home with them.
 composition of wildflowers made of foamiran
 If you start listing the variety of names, you won’t have enough fingers on both hands. There are so many of them that your eyes are dizzying. When making flowers from material, you must strictly follow the templates so that the work turns out to be as similar as possible to the original.
Wildflowers are not large and therefore their implementation is painstaking, detailed work. It requires clear detailing, complementing flowers with stamens, leaves, buds and stems.
One popular one is the "pansy", a bright purple-yellow flower:

 Pansy flower diagram
 Among other spectacular wildflowers, we can highlight cornflower, which will dilute any composition and become a contrasting element. Blue cornflower goes well with chamomile, sunflowers and even dandelions.
 pattern diagram "cornflower"
 Remember that wildflowers always harmonize perfectly with the greenery of the grass, so do not forget to dilute the flower arrangement with leaves, stems and spikelets.
Video: “Wildflowers from foamiran”
Foamiran flowers - orchid: diagrams
Phalaenopsis is one of the most popular and beautiful types of orchids. Phalaenopsis made from foamiran are incredibly beautiful.
- It is very simple to perform, since the flower essentially consists of only three petals
- Each petal should be heated with an iron to give it a natural shape and slightly darken the edges with pastel
- Contrasting edges and small dotted dots with acrylic paint will help make the flower original and naturally beautiful.
- The color of the flower should be exactly repeated and then it will be impossible to distinguish it from the original

 Diagram of phalaenopsis orchid petals
 Video: “Do-it-yourself foamiran orchids”
Foamiran flowers - peony: diagrams
A peony flower made from this material is as natural as possible due to the fact that many petals are used to create it and they are very lush.
To make the petals beautiful and original, pastel applied to the edge of each petal and giving it a cut edge with scissors will help.
 ready-made peony from material
 This material is so flexible that as you crumple it, it will take the desired shape.

 Peony petal cutting diagram
 Video: “How to make a peony from foamiran?”
Foamiran flowers - chamomile: diagrams
Chamomile is the simplest flower and making it from material does not require any special templates; the only condition that needs to be met is to use a template so that the flowers are the same in size.
 flower and leaf template
 The chamomile is made from white foamiran, and its core can be made from half a yellow bead. Chamomiles are good for decorative finishing and creating hair decorations.
Video: “Foamiran flowers, daisies”
Cherry flowers from foamiran: diagrams
Cherry flowers are very simple and easy to cut yourself from material. You should choose a pale pink color and decorate the core of the flower with stamens. Cherry flowers are larger than field chamomile and their petals are much wider.

 cherry blossom pattern
 It is advisable to heat the petals on an iron so that they take on a twisted, wavy shape and darken their tips with pastels.
Video: “Headband with sakura flowers from foamiran”
What can be made from foamiran flowers: compositions
Compositions made from foamiran will perfectly decorate any interior and add richness, romance and joy to the room.
Such flowers are good because they do not require care or watering, and always look fresh and natural. You can safely experiment with decorative ones:
- vases
- baskets
- paintings
- within
- wall decorations
- wreaths
 bouquet - interior decoration
 Handmade work is always highly valued and therefore rest assured that such decoration will become an asset to your room. There are many variations of jewelry and each element is individual.
Foamiran bouquets are often used at weddings and to decorate tables at special events. They always attract attention and often become indistinguishable from real flowers.
Video: “Foamiran. The principle of creating a composition of flowers in a basket"
Foamiran topiary: what is it?
Topiary has long become a favorite decorative element of any interior. It perfectly dilutes boring furniture and attracts attention.
Topiary is made from any decoration and foamiran is no exception. With its help, you can create elastic, beautiful flowers that are easy to attach and look great, creating volume and delighting with rich colors.
 topiary
 A topiary is a flower pot with a tree growing from it. It symbolizes family wealth and business prosperity. Therefore, topiary is a necessary thing in every home.
Video: “Topiary - the tree of happiness”
A peony made from plastic foamiran is a rather lush, beautiful bud that even a novice craftsman can make.
To carry out MK we will need the following types of materials:
- Porous foamiran. To make the craft as realistic as possible, purchase material no thicker than 1 mm. We will need dark green, dark pink and light pink canvas.
- Fixation tape, which can be light green or green.
- Water-based acrylic paints. To make the artificial flower interesting and as realistic as possible, purchase dark pink, marsh and yellow shades of paint.
- Volumetric thick wire that will bend well, with a diameter of 1-1.5 mm. It will be needed to form the stem. For the leaves you need a small piece of floral or thin wire.
- A set of art brushes, as well as foam rubber from which you need to make a small sponge (or sponge).
- Nail scissors and a standard glue gun. You can use any manicure tool that can easily cut foamiran.
- A beautiful mother-of-pearl stone, a voluminous bead or a piece of foil from which the core of the bud will be formed.
We also need a pattern that can be printed or hand drawn. With its help we will form the petals and components of our bud. When everything you need is on the table, you can begin to create a peony step by step.
- Cutting the component parts of the flower according to our pattern.
- A – 10 light pink petals;
- B – 10 petals of a light pink shade and 5 blanks of a dark pink color;
- C – 10 parts of a light pink shade;
- D – 5 dark pink petals;
- E – 5 dark pink parts;
- Z – 3 leaves of a dark green hue;
- M – 6 sheets of dark green color;
- K and L – 5 dark green sepals;
- F – a blank in the form of a sun with rays, from which we will form an interesting core with imitation of stamens.We cut out a pattern from the existing image, transfer it to light pink foamiran and cut out a circle. After that, cut the rays with sharp ends.

- Tinting leaves and petals
Using acrylic paint, we lightly tint the petals of our peony, trying to get the effect of a non-uniform color (either darker towards the edge of the petal, or darker closer to the base). To do this we need a small brush with which we paint all the petals on both sides.

The second stage is the creation of “living” leaves. For this we also use the technique of manual tinting. We paint our foamiran leaves on one side only with darker green paint, and then draw the central veins in the center of the trefoil, distributing the paint from the center to the edges of the workpiece.

- Corrugation of leaves and petals
The initial stage will be corrugating the petals B. We fold the workpiece in small folds according to the “accordion” principle.

- Flower assembly
We prepare the base on which many peony petals will be fixed. To do this, we form a dense ball from foil, the diameter of which should not exceed 1.5 cm. If you decide to use a bead, make sure that it has a wide enough hole. We pierce a hole in the foil ball, pour glue into it and immediately thread the prepared wire into the hole.

We string the workpiece G onto the wire and tie all the upper parts with a thread, placing them above the bead.
We dip the tips of the stamens in yellow acrylic paint, and then attach 10 petals A to them using a glue gun.
We fix the petals B, folded like an accordion at the base, to form small folds. In this way we secure 10 light pink and 5 dark pink petals.
Next next to each other we glue 5 petals C, and behind them, in a checkerboard pattern, 5 more of the same blanks.
The pre-final stage will be gluing five petals D in a checkerboard pattern in relation to the previous ones.
And the creation of the final row of the 5 largest petals of E.
We fix the sepals and begin to collect the leaves as shown in the photo.
Decorate the hairpin with a lush poppy
A red foamiran poppy is a great way to decorate any hair accessory or diversify a flower bouquet consisting of wild plants.

To create it we will need:- dense foamiran in black, green and red shades;
- acrylic paint (red and white);
- bright pastels and a sponge for tinting;
- simple threads, a piece of foil, an iron and curly scissors;
- automatic hairpin without decorations;
- glue, a manicure stick or wooden toothpick, and phlox powder.
When all the materials are ready, you can start the master class. To do this, follow the instructions below.
We draw paper templates by hand in the amount of 8-16 pieces. We need 4 small blanks - 5.5 * 4.5 cm, as well as 4 large ones - 7.5 * 5.5 cm.

We cut out a strip of black foamiran and process one side to create a fringe.
We make the base from a ball of foil, the diameter of the workpiece is approximately 1.7-2 cm.
We tint our petals on one side using a sponge.
Smooth out sharp corners with curly scissors.
Lightly touching our petal with a sponge, apply white paint on one side to the bottom of the petal.
We cut out a circle from green foamiran, put a ball of foil in the middle and begin to form a poppy head. We tie the ball with thread as shown in the photo.
Cut off the excess thread. We turn the ends over (turn them inside out) and glue them. You can lightly tint the core, first with red and then with white paint.
We begin assembling the flower by gluing the fringe.
We form poppy petals by heating the material on an iron set to “silk-wool” mode. We fold the warm pieces like an accordion, twist them and stretch out the middle a little. We do this with all the petals.
We paint the fringe a little white. We begin to glue the petals overlapping, forming rows. First there are 4 petals in one row.
Then we glue the large petals below the first row by about 1-2 mm, also slightly overlapping.
We cut out the leaves and apply texture to them, tinting with paint and shading it with a sponge on both sides.

Glue the leaves by sprinkling them with phlox powder.
The flower is ready. Now all we have to do is glue it to the automatic hairpin using a hole punch or glue. You can do your hair!