
Knitting handbags from polypropylene thread. Crochet beach bag, digest. Two-tone Crochet Beach Bag
A crochet beach bag is a good idea for the summer season and a beautiful fashion accessory. Even a beginner in crocheting can knit a nice fashionable handbag. These bags are very light, roomy and easy to create. It can be knitted using cotton yarn, acrylic yarn, polypropylene yarn or even from garbage bags.
We select the material
First you need the yarn itself. When choosing threads, you need to consider their practicality. The product should be durable, absorb water poorly and dry quickly, without fading or stretching. You can choose yarn made from synthetic materials if it has these qualities. Using plant fibers, yarn made from jute, hemp or cotton is a good choice. Artificial yarn made of acrylic and polyester.
Fancy yarn or unusual materials such as cords, satin ribbons, and strips from bags are popular for knitting handbags for the summer. You can use threads left over from previous works of the same thickness.
The bag is crocheted easily and very quickly; no special skills or pattern making are required. A fabric made of knitted motifs interconnected looks beautiful, but its creation takes more time and effort.
For the master class you may also need:
- hook, a good choice would be bamboo or metal;
- lightning;
- lining;
- handle, you can use wooden rings, cords, strands or chains;
- accessories;
- elements for decoration.
Decorating the bag is the last stage, the most creative. What the future product will be like depends only on the needlewoman, imagination and inspiration.


Cotton handbag
As a pattern for the bag, we will take a lush crochet column. The height of the future product is 33.5 centimeters, and the width is 39.5 centimeters. We will knit the bottom and handles in single crochet columns. We will knit with double thread so that the product holds its shape. When knitting, you can use one regular thread and one rope-like thread.


We will need yarn, a hook, cardboard to strengthen the bottom, and a needle. We knit each new row not from a single crochet, but from an air loop. We knit the main pattern from lush columns. We cast on such a number of loops that it is a multiple of four with the addition of one more loop. Knitting density: 15 loops and 15 rows equal 10x10 centimeters in single crochets. All parts are first knitted separately and then sewn together with a needle and thread. A description of the creation of each of them is below.
First we knit the bottom of the bag, knit 21 stitches, and then a single crochet. To round on both sides, in every 2nd row from the beginning we add: once four loops, once three loops, and twice one loop. At the end there should be 39 loops. We knit nine side by side, that is, six centimeters from the beginning, and we will have the middle of the work. Below is another bottom knitting pattern that can also be used.

Now we finish knitting the bottom; for this, instead of adding, we will decrease in the same sequence. After eighteen rows, about twelve centimeters from the beginning, the last 21 loops remain.
We will knit two parts of the side parts of the bag with a pattern of lush columns according to the pattern in the photo below:

We knit a chain of 45 chain stitches in lush columns, starting with the loops before the repeat: four single crochets, constantly repeating it, ending with the loop after the repeat. Repeat from the first to the sixth row, observing the colors. In the 1st and every 2nd repetition of the pattern we knit with the color in brackets. After this, on both sides we add one loop for the first time in the 2nd row from the beginning, then in every sixth row three times one loop, you should get 53 loops. We finish the work having reached the desired height - approximately 52 rows or 33 centimeters from the beginning.
In order to knit 2 parts of the handles, we collect a chain of nine chain stitches, close it into a ring, and knit single crochets in a spiral. At the moment of transition of the circular row, we constantly knit single crochets without a connecting column. We finish knitting when the handle reaches 76 centimeters. All that remains is to collect all the details. To do this, we sew together the two side parts, and then sew them to the bottom. We tie the top cut with single crochets. And we sew the handles, retreating from the top cut about eight or ten centimeters.
Polypropylene option
Crochet bags can be created from a variety of materials. Unusual materials are popular now, so bags made from polypropylene thread or from garbage bags are becoming more and more popular. Below are several schematic images for creating such interesting bags.


Not all hand-knitted items are clothing items. You can also tie a washcloth for bathing. After all, yarn can be made not only from wool or cotton, but also from polypropylene, products from which are easy to lather and scrub off the dead skin layers well, and then wash and dry quickly. It is pleasant to wash with such a washcloth.
We will tell you how to crochet a washcloth in a variety of shapes - classic rectangular, in the shape of a mitten or in the form of various toys filled with foam rubber. Children will enjoy this kind of bathing especially, and adults will enjoy using handmade products, which are much better than store-bought washcloths.
No holes are formed in the proposed washcloth; its loops hold firmly without moving apart. The washcloth is crocheted from special threads for washcloths using crochet number 2 into one thread. The washcloth is knitted on both sides, in the round, for which 30-40 air loops are cast. The width of the washcloth depends on their number. The synthetic thread resembles polypropylene tape, but this does not interfere with crocheting at all.
Having typed the specified number of loops, we connect them into a ring with a connecting post. The next 4-5 rows are knitted with single crochet or single crochet; no pull-out loops are formed on these rows. Then comes the turn of the rows with these loops, knitted in such a way that they cannot stretch and disrupt the configuration of the product.
Video lesson:

The thread that is used to create the washcloth is specifically designed for creating washcloths and rugs; it is made of polypropylene. You can choose a thread of different colors - the color range is quite wide. A carefully knitted washcloth is much more durable than a store-bought one. First of all, a chain of air loops is assembled, twice as long as the width of the future washcloth. You need to knit carefully, not allowing the thread to delaminate.
The edges of the chain are connected to each other, and a handle is immediately knitted, by which you can hold a washcloth, made of 3-4 stitches. Everything is told step by step for beginners, all actions are described in detail. After several regular rows, rows with elongated loops are knitted, which are tied around the thumb.
Video lesson:

When knitting this washcloth, elongated loops are knitted on both sides. To obtain a more fluffy washcloth, knitting was carried out in two threads. That is, two skeins are used or one, then the second end is additionally pulled from the inside. After casting on an air row of loops, a row of stitches with one crochet is knitted.
The next row is knitted without double crochet. After the third row, we begin knitting with elongated loops, shaping them with our thumb. In the last stitch of the row, a single crochet stitch is knitted. After turning the work over, the next row is knitted with similar elongated loops, and they end up on the opposite side of the product.
Video lesson:

The product is knitted in the round and has two layers. Using double crochets allows you to knit a washcloth twice as quickly and at the same time reduce thread consumption. The washcloth turns out to be soft, gentle, and quite comfortable to wash with. Threads to create the product were used in two colors, since the product is made with a gradient.
We knit with two threads using crochet number 5. 35 air loops are cast on and closed with a ring. The next row is knitted with single crochets. Then the elongated loops are knitted with a double crochet. To make the loops elongated, they are formed using the thumb. The stitches knit together very quickly. Subsequent rows are knitted similarly.
Video lesson:

The washcloth-mitten, made of threads of various colors, resembles a fancy flower. To make it neat and fluffy, we work with one thread. We start with five air loops, which are looped and after one lifting loop, knitted in a circle using single crochets. In the next row, already elongated loops are knitted between the columns of the previous row, securing them with single crochets.
After the air lifting loop, a row is formed with single crochets, increasing their number: one and two stitches are knitted into cells in turn. Then a whole row of elongated loops is knitted again. Gradually other colors are included, and in the photo the washcloth resembles a flower.
Video lesson:

To make the washcloth look fluffy, you need to use a polypropylene thread folded in half. We start the work with a set of thirty air loops and connect them with a ring. We knit a single crochet into each of the air loops. In the next row, single crochets alternate with single crochets. Then the same pattern is repeated.
In the next row, we knit elongated loops into each of the columns of the previous row. These loops are secured in a row consisting of single crochet stitches. The front side with elongated loops remains on the inside. The alternation of loops is repeated until the required length. Next, the washcloth is turned inside out.
Video lesson:

This master class is designed for those who do not know how to knit at all. The training begins with a story about how to properly hold the hook, ensuring its movement. The initial loops are also described in detail. The result is a chain of air loops, connected by a ring that serves as a cuff for the product. A row of single crochets is formed; five rows is enough.
In the next rows, elongated loops begin to form, which are draped over the thumb. The technique for creating these loops is discussed in detail on the screen. Further rows are knitted exactly the same until the washcloth reaches the specified length. You can change the color of the thread.
Video lesson:

The yarn used is double, hook number 5. First of all, 36 chain stitches are cast on, they are connected with a ring, and a row is knitted in single crochets. In the next row, only single crochet stitches are used, then two more similar rows are knitted. Let's start creating the main pattern.
A cone is formed from three yarn overs knitted together. Two stitches are skipped, and another cone of four yarn overs is knitted. The entire row is formed from such cones. This pattern with cones is repeated from row to row. A washcloth made of cones arranged in a checkerboard pattern ends with a cuff made of rows of single crochets.
Video lesson:

The washcloth, dyed in the colors of the Russian flag, is knitted from special yarn for washcloths. We cast on 35 loops, this number will determine the width of the washcloth. The chain of loops is closed, and you can start knitting in the round. The first rows are simple, they form the cuff of the washcloth.
Next, elongated loops of the same size begin to form in the rows, which is ensured by throwing each loop over the thumb. After knitting a third of the length of the washcloth, the color changes; another replacement of yarn is made at 2/3 of the full length of the washcloth. Before completing the knitting, two circles of simple loops are knitted to form the cuffs. Next the handle is knitted.
Video lesson:

Work begins with a set of 30 air loops. The resulting chain is looped, and two rows are knitted with single crochets. The next row is knitted with single crochets. Next, the main pattern is knitted, consisting of three double crochets, with a gap of two double crochets between them.
The result is a beautiful pattern that also closes into a ring. This three-stitch pattern is repeated on all subsequent rows until the remaining length of the washcloth is knitted. The washcloth ends, as it began, with two single crochets. The washcloth is almost complete, all that remains is to tie the handles.
Video lesson:
A crocheted washcloth can be crocheted from different threads: cotton, polyester, but most often washcloths are crocheted from polypropylene yarn. Such washcloths last longer, dry quickly, are bright, whip gel or soap into foam well, and are inexpensive.
Polypropylene threads can be purchased at the market, hardware store or craft store. Of course, ready-made washcloths are sold on the same market, but if you know how to crochet yourself, then why overpay. One washcloth with elongated loops takes about half a skein, and a skein of thread costs no more than 50 rubles.
Yarn for washcloths with elongated loops:
- “The Needlewoman”, produced by the Pekhorsk factory. Yarn composition: polypropylene-100%. Thread length: 200 m. Skein weight: 50 g.
- “For the soul and soul”, manufacturer: Hostess-Needlewoman. Yarn composition: Polypropylene 100%. Thread length: 250 m. Skein weight: 50 g.
- “Craftswoman”, Skein weight: 50 g. Thread length: 200 m. Composition: 100% polypropylene. Manufacturer: Russia.
- ADELIA "RAFFIA" . Weight, g: 50. Thread length, m: 200. Composition: 100% polypropylene.
- Just nameless yarn in bobbins for knitting washcloths.
Often a piece of foam rubber is inserted inside ready-made washcloths. Why do they do this? It’s just that the polypropylene washcloth itself does not create much foam from the shower gel, but with foam rubber any soap base foams perfectly. Moreover, it is more economical. More foam means less gel or soap is consumed.
How to choose threads for knitting washcloths with elongated loops?
Threads come in different thicknesses. The thicker the thread, the tougher the finished washcloth will be. Select threads of such thickness that it is convenient to use them for crocheting No. 3-4. Although the most delicate and soft washcloths are crocheted No. 2, i.e. thin threads. Some people like washcloths that are harder and denser, while others like them softer.
Buy bright threads to match your bath accessories. For children, it is better to knit a washcloth from thin threads in the shape of a mitten or a funny animal.
Before the first use, be sure to keep the washcloth in boiling water for 5-7 minutes, the washcloth becomes pleasant to the body and lathers well.

What shape should I knit a washcloth with elongated loops?
A washcloth with elongated polypropylene loops can be knitted in the form of a pipe in a circle. It is convenient to insert foam rubber into such a washcloth.

- A washcloth for a child can be crocheted in the shape of any toy with elongated loops.
There is one more nuance: the longer the elongated loops, the softer the washcloth.
How to knit elongated loops:
If you have never knitted with elongated loops, then you should first try to knit a sample from simple threads in order to practice and work out the tightness of the knitting. The fact is that you need to knit tightly with long loops, i.e. Tighten each loop with columns so that the fabric is not loose. It will be especially difficult for beginners to immediately knit elongated loops from polypropylene threads.
Knitting elongated loops on a ruler:
Crocheted washcloth with elongated loops, the work of our readers
Our master classes and video lessons will tell you how to crochet a washcloth.
Crocheting washcloths, master class!
Crochet washcloth, step by step description
First we knit 40-45 chain stitches and connect them into a circle.
We tie 5 rows with single crochets, then begin to pull out the loops (see photo).
After pulling, the loops must be secured with an air loop (see photo), otherwise they will crawl out to the wrong side and the washcloth will turn out flabby!!!
We knit the length of the washcloth individually (expecting that it will stretch during use). We finish by tying with single crochet chain loops and tying the handles. A skein of thread costs 25 rubles, enough for 2 washcloths. And cheap and beautiful!
You will need yarn for knitting washcloths and a size 4 hook.
Crochet washcloth with elongated loops, interesting ideas from the Internet
The washcloth is crocheted No. 2; it took half a skein of thread.
This washcloth is crocheted from propylene thread in 2 folds, with crochet number 5. It is knitted equally on both sides, with a “Fringe” pattern or elongated loops.
A washcloth-mitten, just like a regular washcloth, is knitted simply: 1 row of single crochets, 1 row of elongated loops.

Another option for a washcloth with elongated loops.
Materials:
– polypropylene threads of different colors;
– crochet hook (select the size depending on the desired density of the washcloth - the smaller the number, the denser the product will be, and vice versa).

The knitting pattern is very simple:
- 3 rows of single crochets
- 3 rows of lush columns
How to knit lush columns, see the diagram below in the article.

You will need: polypropylene threads of 2 colors. hook No. 3 or No. 4, needle with a wide eye.
The size of the finished washcloth is 14*21 cm.
Crocheted washcloth, crocheted with lush columns:
Your washcloth can be of absolutely any shape and color (depending on the interior of the bathroom). This washcloth is knitted easily and quickly, looks great, and massages simply amazing.
You need to start knitting a washcloth from the handle: a chain of air loops of the required length, which you tie with single crochets, make a connecting stitch with the beginning of the chain, and start knitting the washcloth itself in a circle with single crochets, adding 3 to 5 stitches in each row. In this way, knit to the width of the washcloth you need, then go to the main pattern (lush column), knit 45-50 cm and finish in the opposite direction with a handle. That's it, the washcloth is ready!
Technique for knitting a lush column: Yarn over, insert the hook into the base loop, grab the working thread and pull out a loop of arbitrary length (repeat 3-5 times). The greater the number of broaches, the more magnificent the column will be. Yarn over and pull the working thread through all the loops on the hook in one go. Make 1 air loop to secure the fluffy column. Skip one base loop and knit another 1 puff stitch into the next one.
Crochet pattern for a baby washcloth:
Crochet washcloth in the shape of a ball
Abbreviations used:
- V. p. - air loop
- RLS - single crochet
- CH – double crochet
- СС – connecting column.
You will need:
Hook No. 5.5. Some medium weight cotton yarn in two colors, folded together. Or use thick melange yarn. This will make the washcloth look more interesting. You can knit rows 2 and 3 in different colors. Although the plain version is also good.
Crochet washcloth description:
- 10th century p. combine into a ring, making a SS in the first loop of the chain.
- 1 rub. RLS in the ring, (5 ch, 1 RLS) - repeat 40 times; 30th century p, sc in ring, sl st with first sc.
- 2 r. SS to the first arch from the 5th century. p., 4th century p. (counts as the first dc and 1 vp), (dc, 1 vp) – 7 times in the same arch; further into each arch from the 5th century. n repeat 8 times (dc, 1 v. p.); SS in each loop of the arch from 30 in. p. (to form a loop); SS from the third century. p. from the initial 4 lifting loops.
- 3 r. RLS in the first arch from the 1st century. p., (2 v. p., RLS in the next arch from 1 v. p.) – 320 times; SS with first sc.
Crochet washcloth made from plastic bags
Some needlewomen manage to knit washcloths even from plastic bags. Garbage bags are now available in bright colors, and if you choose the softest ones, then these washcloths probably have a right to exist. This method is especially relevant for those who were unable to buy polypropylene threads in the store, but really want to knit a washcloth. The shapes of the washcloth and the knitting methods will be the same as those made from polypropylene yarn.
To knit a washcloth with a diameter of 9 cm, we will need about 20 grams. synthetic yarn of medium thickness, hook No. 5 for the main knitting and No. 4 for making a connecting seam.
We will also need a sewing needle and scissors. If you want the washcloth to be multi-colored, prepare several skeins of yarn of different colors.
Toy washcloth “Wakka the Frog” made of yarn - 100% nettle fiber from Laines du nord (Italy).
Yarn consumption: green 30g, white 10g, 3 wooden beads, a little pink thread for a flower. Hook 2.5 mm.
Crochet washcloth video tutorials
Crocheted washcloth toy “Clean Bear”
The toy has eyes, a nose and ears. On one side it is shaggy, and on the other side it is smooth and has a comfortable handle.
To knit a washcloth you will need:
- polypropylene threads of three colors: any main color, black and white for the eyes
- scissors
- needle
- hook No. 2.5, hard so that it does not bend
Part 1
Part 2
The video should load here, please wait or refresh the page.
Crochet round washcloth for beginners
We will need: yarn; hook number 3.
The video should load here, please wait or refresh the page.
Crocheted washcloth toy “Funny hedgehog”
You will need:
- polypropylene thread 70-80 g primary color
- polypropylene thread in black, white, green and red
- hooks No. 2.7 and 4.5
- darning needle with wide eye
- scissors
- template to make a flower
The video should load here, please wait or refresh the page.
The video should load here, please wait or refresh the page.
Crochet washcloth with spiral pattern
The video should load here, please wait or refresh the page.
How to crochet a washcloth hard and soft
How to knit a washcloth 2 in 1, hard and soft, crocheting for beginners, video tutorial. To knit a washcloth, we need Needlewoman yarn in three colors, hook No. 4. Washcloths for men (hard side) and women (soft side). We knit the hard side lengthwise and the soft side across.
The video should load here, please wait or refresh the page.
A crocheted beach bag is a great opportunity to crochet a new fashion accessory. Even if you don’t know how to crochet, with master classes and patterns, you have a good opportunity to knit an excellent stylish bag for the summer. Knitted beach bags are lightweight, spacious in size, and easy to make with your own hands. We will crochet a beach bag with our own hands from cotton, wool, acrylic yarn, and also from polypropylene yarn or from garbage bags.
For the pattern for such a beautiful beach bag, we will take a lush crochet column. The knitted bag has a height of 33.5 cm and a width of 39.5 cm. Knit the bottom of the bag and handle with a single crochet (SC). We knit with double thread so that the bag holds its shape well. For the bottom you can take 1 main thread and 1 rope-type thread.

Bag pattern.
To work you will need:
- Cotton yarn (50% cotton, 50% acrylic or polyester) 150 m/50 g, 250 g. white, and 90 gr. turquoise, burgundy, orange, lilac colors.
- Hook 5.5 mm thick.
- Cardboard to strengthen the bottom
- Large needle for stitching parts.
We begin each next row not with RLS, but with VP.
Basic pattern: we crochet a pattern of lush columns. Don't forget that you need to type so many points so that the number is divisible by 4 plus 1.
Knitting density: 15 p. 15 r. equals 10/10 cm. RLS.
All crocheted parts are made separately and then sewn together with a needle and thread to match the color of the bag. We knit the bottom of the bag with our own hands - we start with a chain of 21 stitches and then knit a sc. We add to round the shape on both sides in every second row. from the beginning: 1 time for 4 p., 1 time for 3 p., and 2 times for 1 p. The result is 39 p. We knit 9 p., that is, 6 cm from the beginning - this will be exactly the middle of the work. Here is another option for knitting the bottom: choose which one is easier for you.

We knit the side parts of the beach bag with a pattern of lush columns according to the pattern:

Knit a chain of 45 VPs with white yarn in lush stitches. We start with loops before the rapport (4 sc), this repeat is repeated constantly, and we finish the stitch after the rapport. Repeat from the 1st to the 6th row, observing the colors as in the diagram. In the first and every second repetition of the pattern, knit with the color in brackets.
Then on both sides for rounding, add on both sides in the second row. from the beginning 1 time for 1 p., then in every 6th p. 3 times 1 p., the total will be 53 p. We finish the work when we reach the desired height (52 p., or 33 cm from the beginning).
Handles (2 parts)
Use white yarn to cast on a chain of 9 VPs, close it in a ring, and knit in a spiral sc. During the crossing of the circular river. knit all the time RLS, without connecting. pillar. After 76 cm from the beginning of knitting we finish.
Assembling the bottom and side walls
We sew both side parts and sew them to the bottom of the bag. We tie the top section of the bag with white yarn in a “crawfish step” (RS). We sew the handles at a distance of 8-10 cm from the top cut.
We will continue crocheting bags with our own hands with another beautiful bag knitted with jacquard. Such a beautiful bag cannot leave anyone indifferent. How to crochet a beach bag for beginners? We offer a detailed description of knitting a beach handbag. The bag is knitted from woolen threads with acrylic and is also suitable for shopping. Such a bag can be crocheted from knitted yarn - it will turn out dense and durable.

To work you will need:
- Yarn (wool with acrylic or acrylic) - 100 g each. white, gray, sea green, dark green, 50 gr. brown
- Hook 4 mm thick. and 4.5 mm.
- Pins to mark the beginning of a row.
Take a 4 mm hook. We start knitting the bottom with an amigurumi ring. We knit the bottom until we reach a row that contains 144 sts. We start with a floating loop:

The bottom will be round. We mark the end of the row with a pin or colored thread. In order to make an amigurumi ring, wrap a gray thread around your index finger (Fig. 1), knit the 1st ch, then drop a stitch from your finger and knit the first circular row - 6 sc (Fig. 7). Tighten the ring.
1st row: 2 sc in each stitch, you get 12 loops.
2nd row: add another 12 sts (again 2 sc in each st), you get 24 sts.
3rd row: no increase.

4th row: another 12 p. increase, 2 sc in every second p., you will end up with 36 p.
5th r.: no increase.
6th row: increase 12 stitches, 2 sc in every third stitch, you get 48 stitches.

7th row: no increase.
8th r: 12 p. approx. 2 sc in every fourth stitch, you get 60 stitches.
9th row: change to a different color without increasing it.

10th row: change the color to gray, make 12 sts. increase in every fifth st, it turns out 72 sts.
11th day: no increase.
12th row: add 12 sts (2 sc) in every sixth st, = 84 sts.
13th p.: no increase.
14th row: 12 p. increase 2 sc in every seventh p., we get 92 p.
15th row: change the gray color to dark green, without increasing.
16th row: add 12 sts to every eighth st, you get 108 sts.
17th day: no increase.
18th row: change the color to gray, add 12 sts to every ninth st, making 120 sts.
19th day: change the color to dark green, without magnification.
20th row: change the color to gray, increase 12 sts in every tenth st, it will be 132 sts.
21st: no changes.

22nd row: change to sea green, add 12 sts in every 11th st, it will be 144 sts.
23rd day: change color to gray, no change.

The bottom of the bag is finished. The bottom turned out to be 27.5 cm in diameter. Take a hook 4.5 mm thick. and knit the walls of our handbag with our own hands.
24th row: we knit the lower rim, there are no more increases, all rows have 144 sts. We turn the knitting to the wrong side, we tie the entire row with connecting loops.

25th row: unroll the knitting and knit the entire row with gray sc.
26th, 27th, and 28th rows: RLS in dark green.


29th - 33rd row: we knit according to the pattern, there should be no broaches on the wrong side, since the working thread is knitted together with the non-working thread.
34th row: gray yarn.
35th, 36th and 37th: color blue.
39th r.: sea wave color.
40th r.: white.
41st - 48th row: drawing of squares, diagram:

Don't worry if the squares move to the right, this is acceptable in this type of knitting.

This is what the pattern looks like:

49th r. and 50th rub.: change color.
51, 52, 53rd row: knit with gray yarn.
54th, 54, 55, 56, 57th row: knit according to pattern number 1.

While there is still some time left before summer, try knitting yourself a new one crochet beach bag. With this bag you can go to the beach, to the store, to a picnic, or who knows where else. You can give such a bag to your mother, mother-in-law, or friend. So get down to business quickly, summer is just around the corner...
To make just such a beach bag, polypropylene thread is suitable. Things made from it are light, durable, comfortable and beautiful, which is also very important. Polypropylene threads are sold in craft stores and hardware stores. They are wound into skeins or bobbins. Skeins are most often produced in 50 gram sizes, and bobbins come in different weights: from 150 grams to 1 kilogram. Threads in bobbins are preferable, they are softer, thinner, they can be folded into two threads without rewinding the bobbin, just take the end of the thread from the outside and inside the bobbin and create.
To work you will need:
- About 200 grams of burgundy and yellow polypropylene thread;
- Hook No. 4.
Description of the process of crocheting a beach bag:
Cast on a chain of 50 chain stitches.

Knit a rectangle 7-8 cm wide using single crochet stitches. Use 1 chain stitch for lifting.

Tie it around with single crochets to even out the edge. This will be the bottom of the bag. In order for the bag to keep its shape well, you need to knit one row of double crochets in a circle, inserting the hook under the leg of the previous row. It turns out that the bottom is, as it were, tied to the bag.

Knit the rest of the fabric with double crochets. In the first row of the pattern, you need to make three double crochets over one stitch, skipping two stitches of the previous row, and for the next rows, knit a group of three stitches in the space between the groups of stitches of the previous row.
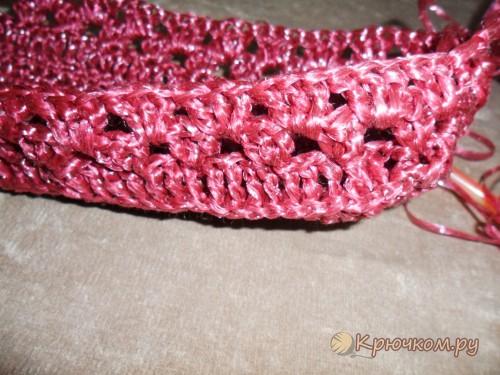
At the beginning of each row, make 3 lifting chain stitches. If you follow the given parameters, you should end up with 32 groups of stitches or 96 single crochets in one row.
After two rows of the pattern, insert a yellow thread into the knitting and knit alternately 3 columns with either burgundy or yellow thread. Three rows in a row need to move the group of yellow columns to the right, and 2 rows to the left. You will get a yellow zigzag.

Continue knitting six rows with burgundy thread, and then six rows with yellow thread. The burgundy thread can be cut, secured and threaded.

The main fabric of the bag is ready. The next 4 rows need to be knitted with single crochets, evenly reducing the number of stitches in the first row to 88, that is, skip one after 12 stitches.

When knitting in the round with single crochets, you don’t have to do the lifting loops, but you need to remember or mark with something (for example, a contrasting thread or a special marker) the beginning of the row. At the next stage, knit the handles. To do this, conditionally divide the number of columns as follows: leave 26 columns between handles, and 18 between one handle.
Having knitted 13 single crochets in the fifth row from the beginning of the row, cast on 60 chain stitches to make a long handle and the bag could be worn on the shoulder.

If you don’t like long handles, then the number of air loops needs to be reduced at your discretion. Secure the chain of air loops by skipping 18 stitches of the previous row, using a half-column and tying them with two rows of single crochets.

Continue single crochet until the beginning of the second handle. The calculations yielded 26 stitches, but since 2 stitches were already used to secure the handle, this means you need to knit 24 single crochets. Similarly, you need to knit the second handle and tie the row to the end.

When knitting the second handle, fold the bag in half and adjust the distance between the handles so that they are symmetrical. Knit another row of single crochets in the round, tying the handles as well. Cut the thread, fasten and thread.
The bag is ready. You can admire your creation. The result is an elegant, small but roomy beach bag in which sand does not accumulate and dust and dirt are easily shaken out. This bag is also easy to wash, dries quickly and does not lose its shape. Wear it with pleasure.
We hope everything worked out for you.
Share your result with us and leave comments.