
How to make a three-dimensional star out of paper with your own hands. How to make a star out of paper (24 crafts) 3D star out of paper, cutting templates
Step-by-step instructions “How to make a three-dimensional star out of paper” will help you create lovely New Year’s crafts with your own hands and you will be able to decorate whatever you want for the holiday.
Photos and diagrams "" will make the creative process simple, exciting and fast. We offer 3 options for volumetric stars.
For a volumetric star you will need:
- Sheets of colored paper. For the third option, the stars are colored cardboard. Or you can make white stars and color them with paints, felt-tip pens...
- Pencil and scissors
- Glue for joining figures and their parts.
The first option is how to make a volumetric star out of paper
From sheets of colored paper, cut out two equal-sized squares.
Fold one of the squares in half on one side, then on the other:
Then fold the square in half diagonally twice, as in the picture:


We make 4 cuts from the edge to the middle of the folds, which we mark in advance with a pencil:

We bend the edges of the future volumetric star. We look carefully at the photo and repeat:

Apply glue to the edges of the rays under the fold and glue them together:

One half of the volumetric star is ready:

Step 6
Using steps 1-5 we make the second half of the star:

Step 7
Apply glue to the rays of one of the halves on the inside:

Carefully connect the figures. An amazing volumetric paper star is ready:


The second option is how to make a three-dimensional star out of paper
The star consists of two parts. We cut them according to the diagram:

You get such cute details for a three-dimensional star:

Carefully, along the fold lines, bend the parts as shown in the photo:

Bend back the places for gluing the parts. The first detail of the future three-dimensional star is ready:

Make the second part for the star in the same way. Use paper of a different color, then the star will shine even brighter :).

To glue the two halves of the star, spread all the places to be glued with office glue and carefully connect the parts:


The five-pointed three-dimensional paper star is ready!

The last and simplest option how to make a star out of paper
For one craft, cut out 2 five-pointed stars of the same size from colored cardboard. Draw them yourself or use this diagram:

Make a cut on each star as shown in the diagrams.
Scheme of notch on one star:

Scheme of the cut on the second star:

Connect the stars by inserting one into the other through the cuts made according to the diagrams and you will get a nice star:

Any voluminous paper star can be decorated with drawings or appliqués, then hung by a thread. They will be wonderful neighbors or...
Good luck!
It’s hard to imagine the New Year without a dressed-up, bright evergreen beauty that gathers the whole family around her, helps create a festive atmosphere, and fills the house with a fabulous, exciting aroma. To decorate a Christmas tree, you don’t have to run to the store for toys; you can do them yourself, using improvised materials that can be found in everyone’s home. Today we will tell you how to make a star for a Christmas tree with your own hands in order to decorate the top of the tree.
A very beautiful Christmas tree decoration will be made from completely ordinary materials that can always be found at hand. Such a top star will look very original on the evergreen beauty and create a festive New Year's mood. And the process of making it is quite simple and will not take too much time.
Materials required for manufacturing:
- cardboard from the box;
- wire;
- special tool pliers;
- comfortable scissors;
- scotch;
- dry glitter;
- bright tinsel;
- Polish for hair.
Let's get to work
You need to cut out two identical five-pointed stars from cardboard. Bend them so that they are voluminous. Glue them together with tape, after putting pieces of fabric, crumpled paper, and cotton wool inside to give more volume. In order to subsequently put the finished product on the top of the Christmas tree, a spiral of wire must be placed inside the star. To prepare such a spiral, you need to take the wire and wrap it tightly around a stick. The excess piece of wire must be cut off. It is best to create the product when the Christmas tree has already been installed, and you can more accurately compare the actual dimensions of the spiral and the star itself.
Lubricate the voluminous star generously with glue and carefully sprinkle it with glitter so that the cardboard underneath is not visible. Allow the product to dry thoroughly. Later, use hairspray to cover the top with glitter so that it doesn’t fall apart. The edges of the star can be decorated with elegant tinsel. The top star is ready, all that remains is to put it on the Christmas tree.
Beautiful, easy to make star

This star for New Year 2020 is very easy to make. Therefore, you can also involve small children in the making of these stars.
For this decoration you will need:
- thick double-sided colored paper or cardboard;
- scissors.
Make this template in whatever size you want.

Copy the template onto colored paper of 2 different colors and cut out 2 blanks. Then bend each of the 2 blanks 3 times along each of the 3 corners, as if 3 ribs are formed.

You will get 2 halves like this:

Now we connect the 2 halves together:

If you glue a stick or pencil inside one of the halves, you will get a top for the Christmas tree. You can make garlands from such stars for a Christmas tree, or decorate a room with them.

A five-pointed three-dimensional star made of paper will be a wonderful decoration for a Christmas tree. A large product can be used to decorate the top of a tree; small ones will look beautiful on Christmas tree branches.
For this decoration you will need:
- paper;
- Printer;
- scissors;
- glue.
To make a voluminous five-pointed star, you can use any thick type of paper. This could be cardboard, old magazines, books, or other types of similar material. For large tops you need to use dense materials; for small stars you can limit yourself to plain paper. For a large five-pointed top, you need to take five sheets of cardboard. Select your favorite jewelry size. Using a printer, print out 5 blanks of the rays of the future star. The resulting templates must be carefully cut out. First glue each piece separately. Then all 5 rays must be glued together. This decoration can be made more festive. For example, decorate the rays with sparkles, sequins or beads. You can make each ray of the decoration from different colors of paper. Then you will get a beautiful, multi-colored top.
Voluminous eight-pointed top
Making an eight-pointed star on top out of paper is quite easy. This decoration can be used to decorate not only the New Year tree. You can decorate a room, window, lampshade and New Year's gift with similar products. The size of such a decoration for the New Year 2020 depends on the size of the paper.

We will need:
- thick paper;
- pencil;
- glue;
- scissors;
- decorative thread.
Let's get to work
You need to take two sheets of colored cardboard, or another type of thick paper, and give them a square shape. After this, each sheet must be folded in half. Once - horizontally, another time - vertically. After this, you need to bend it in half twice diagonally. Next, you need to use scissors to make small cuts along the perpendicular folds. Such cuts should be half a line long. There are 4 of them to make in total. One opposite the other. After this, the edges of the cuts need to be bent one towards the other. You should end up with four triangles. The next step is to coat one side of each ray with glue and glue the second one to it. The result will be one half of the future star. In the same way you need to make the second blank. After this, they need to be glued to each other. When the New Year's decoration is ready, you need to make a hole in one of the rays and thread a decorative thread into it. If you don't have colored cardboard, you can safely use regular multi-colored paper. It is very impressive if you decorate the product with shiny details, beads or other New Year's tinsel.
Star 3D
These tops are easy to make. They are made from thick paper and are a very original New Year's decoration.
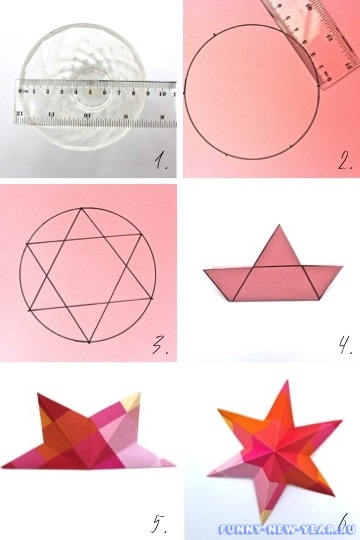
We will need:
- colored cardboard,
- ruler,
- pencil,
- scissors.
![]()
Let's get to work
On thick paper you need to draw two five-pointed stars. To do this, you can use cardboard of one color or several. The next step requires special attention. We make cuts. On one of them it is necessary to cut from the top of the corner to the center, on the other workpiece - from the inner corner also to the middle. After this, the blanks need to be inserted one into the other. This decoration can be decorated with sparkles, artificial snow or other New Year's tinsel.

Small paper stars will perfectly decorate a New Year tree, home or holiday gift for the New Year 2019.
We will need:
- colored paper;
- scissors.
Let's get started:
Any type of paper is suitable for these little stars. These can be regular colored sheets, or pages of glossy magazines, packaging, or any shiny paper. The main feature when working with it is to cut the strips correctly. Their length should be 221 millimeters and width 9. The paper must be cut into pieces of a similar size. After this, you need to take one such strip and fold it into a loop. In this case, one tail should be much shorter than the other. The small tail must be wrapped in such a way as to form a knot. This is a very neat job. It will require a lot of patience and delicacy. After this, the resulting knot must be tightened very slowly (so as not to tear the paper) and pressed. The result will be a smooth pentagon. The tail must be tucked in the middle. After this, the strip with the resulting pentagon needs to be turned over and the tail tucked inside this figure. If the strip turns out to be very long, it can be folded in half and only then hidden in the middle. Next, the long end must be wrapped around each side of the existing pentagon. It needs to be about 15 turns, but not less than 10. Each edge must be turned at least twice. The end of the ribbon is hidden inside. Everything is ready :)
Master class with video instructions:
All that remains is to gently press on the middle of each edge. The result will be a voluminous New Year's craft. It can be decorated with shiny New Year's tinsel.
Origami star
A beautiful origami paper star will perfectly decorate not only a festive Christmas tree, but also a room for the New Year 2020.
 step 1
  step 2
  step 3
  step 4
  step 5
  step 6
step 7  step 8
  step 9
For this craft you will need:
- sheets of plain paper.
The main thing is that the material is not too dense and bends perfectly. You can use both children's colored paper and regular newspaper.
Let's get to work
First you need to make a square with straight sides. After this, such a sheet needs to be folded twice. Once - vertically, the other - horizontally. There will be 4 marked squares on a piece of paper. The corner of each of them needs to be bent towards the center. Two corners that are located opposite each other need to be opened. After this, the paper must be bent along a horizontal fold. This turned out to be one of the preparations for the future elite. You need to make 5 similar figures. The blanks need to be inserted into each other. Those corners that you bent will hold the finished structure. When folding New Year's decorations, pay special attention to ensuring that the corner of one block is inside the second, and the corner of the second is inside the first. When you attach the last part, you need to glue a loop to one of the corners.
Each child tries to decorate their room in their own way. Some people draw pictures, and some make paper crafts and hang them all over the room. Most often children want to make stars. They can be used to decorate not only walls, but also to depict the starry sky.
Stars can be made large, small, colored, voluminous, pentagonal and octagonal. Such crafts serve not only as decoration, they bring a lot of pleasure and happiness. And also the manufacturing process perfectly develops fine motor skills and imagination.
Volumetric paper stars
There are many options for making three-dimensional stars. Let's look at some of them.
Octagonal star. To make this craft you will need:
- Paper;
- Scissors;
- Pencil;
- Glue or double-sided tape.
Diagram of a volumetric star made of paper:

Option for beginners
For it you will need:
- Cardboard;
- Simple pencil;
- Scissors;
- Glue.
A step-by-step diagram of how to make a paper star with your own hands:

Craft in origami style
To make it, you only need colored paper and scissors..
Manufacturing stages:
- Cut strips. Their width should be 1 centimeter and length 30 centimeters.
- Make a loop out of the flat and insert the tail into it. You will get a knot in the shape of a pentagon.
- Now this pentagon needs to be wrapped with the same strip. Wrap each edge twice and hide the tip under a strip of paper.
- All that remains is to give the craft volume. To do this, take it in your hands and press on each edge in the middle.
- The origami star is ready.
Unusual paper stars
New Year's star from a roll from a paper towel. To make this craft you need:
- Paper towel roll;
- Scissors;
- Brush.
- Transparent colored film from candies or flowers.
Making master class:

New Year's garland
To make such a garland, you need colored paper, a hole punch, a ruler, thread, and a sharp stick.
Manufacturing stages:

Paper star ball
To make such a craft, you need:

Step-by-step master class:
- Cut each leaf in half.
- Spread the edges of each part with glue and twist into tight tubes.
- Attach three rays using a stapler in the form of a fan.
- The resulting fans need to be strung on a thread. You should get a spiky star in the shape of a ball.
These unusual and interesting stars can be made from paper. Choose any option and get creative. Good luck!
Attention, TODAY only!
As a rule, the older a person gets, the more nostalgic he begins to remember his childhood years. For many adults today, this time is permeated with Soviet symbols, among which red stars can be noted.
In this master class I will show several options on how to make a paper star with your own hands with step-by-step photographs. This five-pointed symbol may still be relevant today. For example, a red star is perfect as or for decorating a New Year's interior. It is not difficult to make it from paper, focusing on the proposed master classes.
01. DIY voluminous paper star
To create a three-dimensional star, we will need to prepare:
- red paper;
- scissors;
- pencil;
- ruler;
- PVA glue.

First, cut out 5 squares of the same size from red paper.
Our blanks have a side of 9 cm.

After this, you can begin to add each square. First we make a diagonal fold.

Then we unfold the square blank. Fold the right side towards the middle.

A similar fold should be made on the left side.

Now we need to make bends in the upper part of our workpiece. First we bend the right side.

After this, we make a fold on the left side. Our blank took the shape of a rhombus.

Fold it in half.

The top layer needs to be folded to the side.

In this case, you should pay attention to the fact that on the reverse side the vertex of the triangle coincides with the fold line.

Unfold the workpiece slightly.

Smooth the fold lines.

Now we begin to straighten one of the rays of the future star.

Carefully straighten its inner layer.

Now we give the workpiece the following appearance. We have an element consisting of one whole beam and a half.

We need to make 4 more such blanks.

You can start assembling the star, and for this you will need glue. Apply it to one half of the beam.

After that we insert one element into another.

So we connected 2 modules.

We glue the remaining elements together in a similar way. Our volumetric paper star is ready.


02. How to make a star using modular origami technique
The modular origami technique allows you to create three-dimensional figures using identical elements. Our master class presents the step-by-step production of a star from several modules.

To work you will need 10 square sheets of paper. We took red writing sheets.
We start by making one module. For it we need two sheets. First we bend them along two diagonals. Now these same sheets of paper should be bent in transverse directions, but in the other direction.

From one we fold the workpiece in the form of a double square.

From another sheet of paper with pre-designated folds, we fold the workpiece in the form of a double triangle.

Now we insert the triangle inside the square.

We bend the protruding ends from the square inward. First we do this from two opposite sides.

Then we unfold the module blank and bend the protruding corners again. This is how we got one of the modules.

We need to make 4 more such modules for the future star. Let's start connecting the modules. They will be attached to each other due to the corners protruding on the sides.
Two corners of one piece should be inserted under the folds of the other from the inside.

We insert the corners of the other module from the outside under the folds of the adjacent one.

So we continue to connect the individual modules.

We close all 5 elements into a ring.

You can leave the origami star as is, or you can slightly raise its upper part.

03. Volume star made of paper for a postcard

On a white sheet, draw a star stencil, as in the photo, and prepare a sheet of red cardboard.

Cut it out.

Bend the workpiece - all the short strips are bent inward, and the long strips are bent outward. Glue it to the base. This way you can make a three-dimensional star for a postcard for February 23 or May 9.


How to make a five-pointed star out of paper video tutorial
If you want to decorate your home for a holiday or just like that, and you want to do it yourself, then a star is one of the elements that will always look beautiful in a room, on a stele, on a chandelier or Christmas tree.
In this master class you will learn how to make stars with your own hands using a huge number of different methods.
All the methods are quite simple, so everyone can choose what they like best.
The main material from which you can make a star with your own hands is paper. You can use cardboard, plain paper, thick paper, magazines, old books, newspapers.
How to make a three-dimensional star out of paper?
Five-pointed star.
You will need:
- Printer
- thick colored paper
- scissors
1. First you need to print the blank.
2. Cut out the templates and bend them in the places indicated by the dotted line.
3. Glue all the parts together and you will have a three-dimensional five-pointed star!
Scheme on how to make a star
2. Using scissors, make cuts along the perpendicular fold lines. The cut should be approximately half a line or slightly less. In total you need to make four such cuts.
3. Fold the edges as shown in the image.


4. Now prepare the glue and lubricate one of the sides of each ray of the future volumetric star and glue it together (see picture).
5. Make the other half, following the same instructions.
6. Finally, glue the two halves together and decorate to taste.
How to make a star out of paper?
Making such a star is very simple. It is made of just two stars cut out of cardboard or thick paper.
You will need:
- pencil
- ruler
- thick colored paper or cardboard
- scissors
1. Draw a star on thick paper or cardboard.

2. You can decorate the stars as you like and cut them out.
3. Now you need to make a cut on each star - on one it should go from top to bottom (from the outer corner to the center of the star), and on the other, vice versa, i.e. from bottom to top (from the inner corner to the middle of the star).
4. Using the cuts, connect the two stars by inserting one into the other.
How to make a paper star? Convex star.

These beautiful little paper stars will be an excellent decoration for your interior, postcard or gift.
You will need:
- colored paper (you can use pages from an old magazine)
- scissors (stationery knife)
* The key point in this master class is the correct cutting of paper strips.
* Stripes must be even. In this example, their width is 9mm and length 221mm.
4. Let's move on to the most interesting and at the same time simple process - making an asterisk.
Wrap a long strip around each side of the pentagon. You need to do 12 to 15 wraps. This means that each edge needs to be wrapped at least twice.
5. Tuck the remaining tip of the paper inside your star.
Hold your pentagon with two fingers of one hand. At this time, use the fingertip of your other hand to lightly press on one edge. You need to get to the middle of the edge.
This process needs to be done with all the edges and you will get a beautiful star.

How to make an origami star?
You will need: paper, scissors. Cut the paper into squares and fold according to the pattern.

