
How to tie a bow on the corner of a box. An original bow for a DIY gift. How to tie a bow from a ribbon
In our lives, almost every day is a holiday. Before you have time to celebrate the New Year, Valentine’s Day is already approaching, and after it is March 8, and even friends are celebrating their name days. All these dates have something in common - gifts. Choosing the perfect gift is only half the battle, but packaging it is a whole art. It is important not only to find suitable paper and ribbon, but also to wrap the box beautifully with them. Let's figure it out
Preparatory work
We use bows not only during the holidays, but also in everyday life. They can be used to decorate the house (for example, hang on curtains), decorate hairpins, clothes, or use in handicrafts. There are a lot of options for their use, as well as ways to do it. First, you need to choose the most suitable material for your craft.
Selecting a feed
First of all, you must clearly decide what you are going to make the bow for and approximately what color it should be. If you are packing a gift, the width of the ribbon must be chosen depending on the size of the box: wide ones are better for large gifts, and narrow ones are better for small ones. Although, if you decide to go against the rules and tie a huge wide bow on a small package, it can look very good.
Remember the golden rules

If you are planning to make a beautiful ribbon bow for a dress, pay attention to
its texture. It should go well with the fabric from which the clothes are made.
To determine the length of the ribbon for a gift box, you can use the following method: wrap the gift twice and add about 60 cm to the resulting length for the bow itself.
Most often, satin fabric is used to tie a beautiful ribbon bow. But if you do not have experience in this matter, this material may seem too slippery and inconvenient for creativity. In this case, it is better to objectively assess your abilities and give preference to rougher material.
A very convenient option for bows for gifts and bouquets is a ribbon with a thin wire attached to the edges. It allows you to give the product any shape and preserve it for a long time.
Always remember the most important rule when choosing ribbon: if you can tie it into a tight knot that doesn't fall apart, then it's perfect for your creation.
Collecting the rest of the materials
To make a bow you will also need:
- glue (test it in advance for its ability to fix the fabric);
- sharp scissors that will clearly cut the tape and not chew its edges;
- floral wire (this material is not always necessary, but when making some models you can’t do without it);
- additional decorative elements - beads, flowers, stars and any other trinkets with which you want to decorate your product.
So, we selected the materials to make a ribbon bow. A master class on how to create one can be mastered by anyone, regardless of their experience in needlework.
Classics of the genre
First, let's try to make a very ordinary bow, without extra layers and details. But do not think that if it is simple in execution, it will look less advantageous than its curvy counterparts.

So, how to tie a beautiful ribbon bow? You must follow these steps:
- Measure the required length and cut the desired piece. It is better to take extra material so that there is certainly enough of it, and the tails of the bow are long and graceful, and not microscopic and sticking out in different directions.
- Remove everything unnecessary from the table and lay the tape on it (you can do this on the floor or bed - it doesn’t matter, the main thing is that you have a flat surface in front of you, not cluttered with foreign objects).
- Straighten it out and lay it out in front of you. If necessary, iron it with an iron.
- Cross the ends of the ribbon in the center to properly tie the satin ribbon bow. If you did this correctly, you should have two even teardrop loops of the same size. These will be the ears.
- Before taking the next step, carefully check the dimensions of the parts so that one half does not end up larger than the other. Take the same measurements with the tails - they should also be perfectly the same (unless, of course, you have conceived the concept of a bow with ends of different lengths).
- Now we cross the droplets, placing them on top of each other.
- Wrap the left ear around the right one and pass it through the loop that appears in the central part.
Tighten the resulting knot tightly so that it does not come undone at the most inopportune moment. Correct every part of it - and that’s it, our decoration is ready!
Fork to the rescue!
If you want to make a small beautiful bow from a thin ribbon, it is very convenient to use auxiliary objects when creating it. Since tying it by hand is quite difficult, you will need a very ordinary fork for this purpose.

This cutlery, which is found in any home, will help you make even the smallest beautiful ribbon bow. You can independently adjust the size of the future product by increasing the width of the teeth with cardboard. To make a beautiful bow using a fork, you need to follow these steps:
- Straighten the tape and wrap it around the device.
- Twist one end and pull it under the ribbon between the middle tines of the fork.
- Lift this end from the opposite side. This way you will wrap the entire fork.
- Pass the same part of the ribbon in the upper zone, stretch it to the front of the cutlery.
- On one side you have a loop that you don’t need to touch yet.
- Continue working with the same tip. Wrap it around the right side and insert it through the bottom into the loop.
Now tighten the resulting composition, carefully remove it from the fork - and that’s it, the miniature bow is ready.
Wire won't hurt either
Another useful assistant when creating bows is floral wire. With its help you can make both classic single-tier and lush crafts.
For gifts, bouquets, hair decorations, clothing and interior decor - you can use this ribbon bow anywhere. The master class on how to create it is extremely simple:
- Cut the length of ribbon you need.
- Lay it out on a flat surface and smooth it out.
- Bend the material on both sides and cross the ends in the central part. Place them on top of each other. This way you will form the ears of the future bow. Don't forget that their ends should hang freely in the form of ponytails.
- Hold the resulting composition in the central part so that all its elements remain in place.
- In the middle, tightly wrap the workpiece with wire.
- Cover the joint with a piece of tape of the same color or one that goes well with the main one. Secure with glue or sew with thread.
- Tidy up the ears and tails by straightening them and arranging them symmetrically.
This is how we make a beautiful ribbon bow. You can safely use it for any decorative purposes.
Two in one
If you want to make a simple bow, but not with two ears, but with four, folded in two layers, you do not need to cut out each element separately. To create this craft, as in the case of a regular bow, you also need one complete ribbon.
This decoration is perfect for decorating gifts, as well as for decorating hairstyles and any other type of decor. So let's get down to business.

- Cut a large piece of tape and lay it out in front of you.
- Bend the first loop, then the second. Do not let go of the central part so that the composition does not fall apart. If you have difficulty holding the tape and working with it at the same time, have someone help you until you can do it yourself. When you get the hang of working with ribbon, you can make multi-level decorations this way, but for now it’s better to limit yourself to a two-layer craft.
- Cut off the excess parts of the ribbon, and pull the remaining part in the center with wire or sew with thread.
- Wrap a ribbon of a matching color around the central part so that the fixation point is not visible. Secure it with glue or sew it too.
You've made a beautiful two-layer bow. Now you can hook it wherever your heart desires!
Making a curvy bow
To make a beautiful bow from a wide ribbon, it is best to use a material with wire stretched along the edges. In this case, it will be much more convenient for you to give the decoration shape and volume. This craft is ideal for gift boxes.
For a medium-sized gift you will need the following materials:
- approximately 2 meters of tape;
- glue gun;
- double sided tape.
So, your steps to make a beautiful ribbon bow:
- Wrap the box in gift paper;
- Cut the required amount of ribbon and wrap it around the gift.
- Secure the future bow to the box with glue. In this case, you cannot cut the ends of the tape, since you will need them for further creativity.
- Bend one end of the material to make a loop. Glue the resulting droplet to the box in the central part.
- Fold the loop several times to create pleats. Each of them is a separate ear of the future bow.
- Fasten the loops together and glue them to the package.
- In the same way, you can make even more of these droplets and fix them on the box.
- Follow the same steps to create the second half of the bow.
- Use scissors to tidy up the drooping ponytails.
To hide the place where all the elements are fixed in the center of the craft, cover it with a separate piece of fabric.
We refine the ends of the ribbon
When creating any bow, each element plays a very important role. Not only the ears of the craft, but also its tails should look neat and symmetrical.
When we tie a bow from a satin ribbon (or any other), we need to make sure that its hanging ends are as long as possible. You can shorten them at any time, but increasing them without untying the loops is extremely difficult and virtually impossible.
To make the bow look neat, you need to trim the ends of the ribbon correctly. Thanks to this, the material will not fray, you will remove excess threads sticking out from the edges, and the entire appearance of the product will become much more presentable.
For best results, use sharp scissors that won't chew on the fabric. To trim the ends, you can choose one of the two most common methods:
- Diagonally: run scissors across the tape at any angle you like.
- V-shape: Find a point in the center of the ribbon near its end, mark it with a pencil or pen, cut two lines towards it from the corners of the ponytail. If the triangle you cut does not separate from the fabric on its own, carefully peel it away from the area where it is still attached.
Choosing additional decorations

Finishing the ends may be the last step in tying a beautiful ribbon bow, unless you want to decorate it with additional baubles. Depending on the occasion, your tastes and the content of the gift, these can be a variety of elements.
For example, a bow for a New Year's gift can be decorated with a small decorative snowflake, a bell, or Santa Claus. Rhinestones, beads, flowers, stars, hearts, etc. are suitable for making a hairpin or clothing.
Decorate wisely!
In any craft store you can find a lot of suitable parts. They can be attached not only to the ribbon itself, but also to the wrapper next to it, if we are talking about gifts.
When choosing additional elements for the bow, it is very important not to overdo it. It’s better to just tie a pretty bow from a ribbon and decorate it with one cute trinket than to cover it with a bunch of all kinds of decorations, which together will look cheap and tasteless. Create with intelligence and inspiration. And you will definitely succeed!
A universal selection of gift ideas for any occasion and occasion. Surprise your friends and loved ones! ;)
Hello all readers! Today, as always, Nastya Skorekeva is with you with a story about how to make a bow for a gift. And in as many as 10 ways
Like you, I love wrapping gifts (I don’t think you would have come to this article if it weren’t for this)) But simply wrapping a present in beautiful paper is sometimes clearly not enough, even if the surprise is already made with your own hands. There is a feeling that something is missing... But what?
Definitely banta! It will decorate both a small gift and a large Bentley (just kidding, but why not?))
And now I will show you several ways to create this decoration from different materials.
Satin ribbon bows
What is good about satin ribbon? At a minimum, its convenience lies in the fact that it is not afraid of water, that is, rain will not turn it into a multi-colored mush.

On the other hand, a creative person may find this decoration useful in the future, to complete their own projects, that is, it is such a complementary mini-gift. Yes, it looks interesting and unusual)
Well, why pour water, here are 5 ways to create a bow:
- Classical
- Double
- Multilayer (terry)
- Lush
- "Chamomile"
Classical
This is the most common bow that is used almost everywhere. The most important thing in it is to carefully straighten all the folds and not to pull the central part too much.
In order to make it you will need a small piece of satin ribbon. Then follow the diagram:

Double
In fact, it can be multi-layered. To do this, you need to fold one strip once or many times, and shape the other into a bow, folding the ends crosswise in the middle.
The entire structure must be connected using another tape.

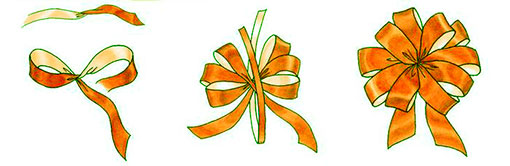
Multilayer (terry)
It’s just very impressive) To create it, take a long piece of ribbon (enough for several folds). Again, fold a number of times.
Now cut two triangles in the center, as in the photo. Tie the center with a small piece of ribbon and “fluff” the bow, pulling out all the elements, starting from the inner ones. Pull it out from the right, then from the left, taking turns processing the sides of the bow.

Lush
For this you will need three different ribbons (this is optional, but the effect will be cuter).
Fold one 4 times so that all layers are on top of each other. And process the second one in the same way, but straighten the ends so that they lie crosswise.
Drag the beauty with the third ribbon and that’s it)

Flower
In some ways it resembles a multilayer one, but is distinguished by its greater flatness. The beginning is repeated.
The only difference is that there is no need to make cuts in the center of the multiple folds. Due to this, the petals will straighten out more flatly than for a multilayer one.
Paper ribbon bows
Whatever you say, we almost always have paper at hand. Yes, and you can buy it in a much larger number of places, unlike the same satin ribbons.
Therefore, I have prepared for you several types of original paper decorations as gifts:
- Origami
- Star
- Chrysanthemum
- By template
- Flower explosion
Origami
Anyone who likes to fold something like this out of paper will definitely like this method. For it you will need a square sheet of the required size. Fold it 4 times, and then proceed according to the scheme:

Star
For this chic gift decoration, prepare a few strips of paper. Fold each strip into a figure eight with the ends toward the center and secure with a stapler or glue.
Having made 8 pieces in this way, connect them according to the diagram. Attach one round piece in the center to complete it. You can also glue a bead instead.

Chrysanthemum
Very similar to multi-layer. Only after fastening in the center with a ribbon (or wire) are the parts of the resulting loops cut into several strips.

By template
A bow consisting of two pre-cut parts will also look interesting:

It looks very elegant, and it’s easier to handle than the same origami.
Flower explosion
To be honest, I thought for a long time what to call this hugeness. It turned out a little extravagantly, but in my opinion it was appropriate.
For this you will need several decent pieces of tissue paper that need to be folded many, many times. Then cut the edges into a semicircle or triangle and straighten the edges.

Well, dear readers, this is where I say goodbye to you. Be sure to tell us which bow you liked the most. And also share your options. See you soon!
P.S. Subscribe and get a lot more interesting things and also share with friends on social networks.
Sincerely, Anastasia Skoracheva
Are you going to visit, have chosen a gift, and now you don’t know how to wrap it? Then you are at the right place. In this article, we’ll look at how to make a bow from ribbon to decorate gifts, and we’ll also tell you how you can make an exclusive gift for every taste from an ordinary ribbon.
How to create a festive mood?
A beautifully packaged gift with original decoration always creates a festive mood, no matter whether you give it or whether such a gift was given to you. It is a beautiful bow, which can be called a classic decoration technique, that “warms up” the imagination, making you tremble in anticipation of a surprise. The originality of this decoration lies in its versatility, since a bow from ribbons can be made of different shapes or sizes, and today’s market offers a wide range of colors, from plain to complex patterns. Such decorations can give the souvenir more solemnity. Initially, you need to pack the surprise in gift paper, how to do this, read the article: well, we will teach you how to make a bow from a ribbon, the main thing is to be patient and not quit work after the first failure, because the wonderful grateful smile of the hero of the occasion to whom you are gathered guests deserves a little effort.
How to make a voluminous bow from ribbon to decorate a gift?

To get a truly voluminous bow, you need to give preference to cuts made of hard material. Having selected the ribbon, do the following:
- Having decided on the size of the bow (the longer the loops, the larger the bow), you need to make loops from the ribbon in 5-9 folds, placing them one on top of the other.
- Smooth out the resulting loops and carefully trim the edges, as shown in the photo below. You should end up with almost triangles around the edges.
- Take the loops by the middle and spread them to the sides so that the cut out parts are in the center.
- Secure the narrowest central part. You can do this:
- the same ribbon;
- sew with thread;
- fasten with a stapler;
- twist with wire.
- Straighten the resulting half-loops, give them volume and the beautiful bow is ready!

How to make a lush bow from ribbon? Video lesson
How to make a simple bow from ribbon to decorate a gift?

You can make a strict version for a “male” present. It will look great both on the packaging and on a bottle of an expensive strong drink. And you can read more about souvenirs for the men's holiday in the article:. Let's get started:
- Cut a piece of wide ribbon of the required size, roll it up, and glue the edges with glue. It should look like a ring.
- Flatten the resulting ring.
- Hide the joint under the same, but thinner cut.
- Carefully glue the edges and the simple decoration is ready.

How to make a ribbon bow - a classic option
The classic version of the decoration is very simple to make, and at the same time creates an excellent frame for any gift.

With such a bow, a book, a box of chocolates or a service, as well as ordinary wildflowers will look great. This classic is performed according to the following steps:
- Take a long ribbon and fold it into two loops, as in the photo below. There should be one addition in each hand.
- Place the loop on the left at the back, crossing the two folds. It turns out to be a circle at the bottom.
- Pull the right loop through the formed circle and pull it off. The middle should be in the middle.
- Straighten the loops - the beautiful bow is ready! If necessary, you can cut the lower ends to the desired shape (oblique, triangle, etc.).

Video tutorial: how to tie a bow from a classic style ribbon to decorate a gift?
How to make a Dior bow from ribbon to decorate souvenirs?
The Dior bow is used not only to decorate gifts. With its help, unforgettable decors are created for parties, weddings and other celebrations. By the way, take note of the rules of behavior at the table at such celebrations. They are described in the article: .

To make such a bow, you need to follow these steps:
- Prepare four cuts of different lengths.
- Roll each of them into a circle and secure with thread or glue.
- Stack the circles incrementally one on top of the other.
- Tie the resulting structure of ribbons in the center, inserting the binding tape into the upper (smallest) circle, as in the photo below.
- Fasten the structure.

How to make a ribbon bow on a fork?
Do you believe that you can tie a beautiful bow on a fork? No? Then let's learn, we suggest trying out two options for making such a decoration.
Option No1
Let's try to solve the following equation: Ribbon + Fork = Original bow. To solve, you need to do the following:
- Cut a narrow ribbon of the desired size. For ease of use, it should be at least 18 cm.
- Conditionally divide it into long and short sides. The short side will not be used.
- Pass the long part between the 2-3 teeth of the fork you are using.
- And bring its end up between these same teeth.
- After these steps you should get a small loop. Don't tighten it yet.
- Thread the remainder of the long end through the loop inward again.
- Pull this end out and tighten the knot.
- Trim the long ends as needed and singe them with matches or a lighter.

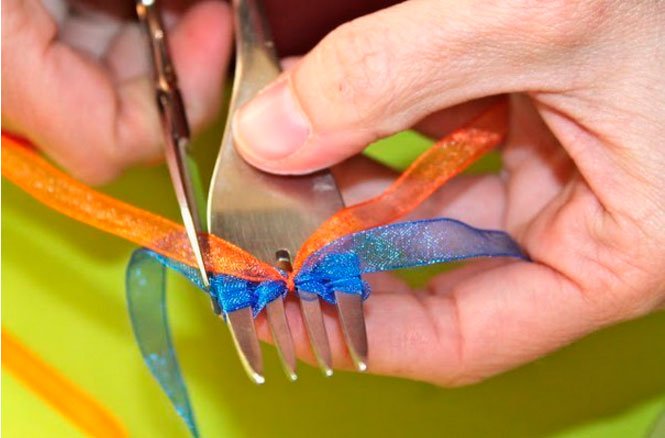
OptionNo2
To get a beautiful bow in the form of a lush flower, you need to use two different ribbons:
- thin;
- wide nylon.
Execution steps:
- Insert a narrow ribbon transversely into the center of the fork. You will need it almost at the end of the work.
- Use a wide piece of nylon to braid the teeth of the fork, as shown in the photo below.
- Use a thin ribbon to tighten the bindings and tie them.
- Remove the workpiece and straighten it.
- Scorch the edges with fire.

The decoration is delicate. It will ideally complement any souvenir intended for the fair half of humanity.
Video lesson: how to make a ribbon bow on a fork
Photo ideas for decorating gifts with bows


The presentation of a gift is of great importance. A beautifully wrapped box with a lush or original bow produces a good effect. In this article we will present several options for tying a bow on a box in different ways. To do this, you need to purchase a satin ribbon at a hardware store and wrapping paper at a stationery store.
There are many gift design options. This is the simplest single one with two rings, and a lush multi-layered one. You can make a separate flower or ball from ribbons and then insert it into the tying in finished form. For this you will also need templates made of dense material and scissors. Some people simply plant such a ready-made flower on tape in the middle of the lid, without tying the box itself.
The tape is used in completely different widths. It can be very thin - 5 mm, or you can take it wider - 5 cm. It all depends on the creative idea of the author. If this is your first time trying your hand at this simple art, then look at how to tie a bow on a box in the simplest way.
Regular single bow
The design of such a bow begins by running the ribbon under the bottom of the box. Both ends are crossed from above in the center or shifted to the side, and the long edge of the tape is once again drawn under the bottom of the box, but in a vertical position. Then a knot is tied where the two ends cross. All that remains is to make a simple bow, like on laces.

With this method, there will be no knot on the bottom of the box, the ribbons are positioned evenly, so the gift will have a solid base. The edges of satin ribbons can be cut in different ways: bevel, corner, even. It is advisable to scorch them with a lighter or candle so that the tape does not split.
Lush bow
Let's look at another way to tie a bow on a box. The tape is divided into two parts. One is used to tie a gift. The ribbon is passed under the bottom of the box and tied with a knot in the center. Then work begins on laying another piece. To make the bow magnificent, you need to fold the ribbon in turns one on top of the other, as in photo number 3. Then this bundle is woven into a knot. To do this, place it in the center of the box and tie it with the ends of the first ribbon.

The more turns, the more magnificent the finished decoration. All that remains is to straighten each ring with your fingers and turn it around so that they are arranged in a circle.

Such a lush bow can only be made from a soft and thin ribbon; if the material is denser, it will puff up and the knot will be rough and thick. This can be avoided if you know how to tie a bow on a box using the following method.
Stitching individual elements
This decoration is made separately. Subsequently, it can either be glued to the box with tape, or tied into a ribbon in finished form. Such a flower is made from several strips of different lengths. Since the turns are sewn in pairs, you need to prepare two long segments for the lower part, two medium ones and two short ones for decorating the middle. Let's look at step by step how to tie a bow from a satin ribbon.
1. Prepare segments of the required length. The shortest one is the middle one, it is presented in a single copy.
2. From each segment you need to fold a figure eight and sew the middle with a stitch.

3. Fold the identical eights perpendicular to each other and sew them together. Cross-shaped blanks are obtained.
4 - 5. All parts are fastened together. At the bottom is the largest one, then at the middle one, and at the top is the smallest one. A part represented by a simple ring is inserted into the middle. Place it with the seam down so that it is not visible.
6. The result is a lush and durable bow. It can be made from any material, even thick rep or velvet.
Paper version
You can create a beautiful composition using special paper packaging tape. To do this you will need a template and sharp scissors. Instead of a template, you can make several turns around your palm. Then it is folded in half and one side is cut off from both sides, as in the photo below. This is done so that the central node is not thick. The tape is unrolled so that the cuts are in the center and tied with a thin strip. Let's look further at how to tie a beautiful ribbon bow.

All that remains is to carefully straighten all the coils and turn them in all directions. This is done so that they are distributed throughout the circle. Finally, the bow is attached to the gift wrapping or tied into the weave of stripes around the box.
Now you know how to tie a beautiful ribbon bow. But you can design the edges of a lush flower in different ways, and it will look more original.
1. A fluffy paper bow is made, described in the last section. Next, you need to cut each turn of the ring in half with scissors. If you look at the red sample, all the edges are cut with corners, forming aster petals.
2. The second pink option in the photo has rounded edges with a recess in the middle. To do this, fold each end of the tape in half and cut off a corner on one side and the other.

3. A pale green flower looks interesting. Before tying a bow on a gift, each turn in the middle of the ring is cut with the ends of scissors into several parts, depending on the width of the ribbon. The result is a chrysanthemum that looks very impressive on gift packaging.
You can come up with your own method for cutting the edges. There will be the most unique design solution.
Original decoration
Satin ribbon? It’s not difficult, and this method looks unusual. After all, the bow turns out horizontal. It can be done using different methods. The first option is to correctly fold the tape in turns, from the largest to the smallest in the center. It is better to keep the bow from falling apart, fasten it with glue or secure it with stitches.

The second option is to create a composition from individual elements by gluing together segments of different lengths, folded in half. We insert a separately cut piece of strip into the central coil and tie a bow beautifully. You can cut out a larger number of turns from a satin ribbon, then it will be more magnificent. It's a matter of taste and quality of material.
Composition of several elements
Gift packaging made from several ribbons of different quality and color looks beautiful. Let's consider this option, how to tie a bow. Cut two pieces of satin ribbon, wide and narrow. For variety, you can include an element from a different material in the creation of the product, as in the photo below. Then three bows are sewn separately in descending order.
Then you need to attach the finished bow to the packaging.
In the article we introduced you to various basic options for tying bows. These skills will be useful not only to those who do not know how to arrange gifts in a box or bag, but also to mothers who want to learn how to beautifully tie a bow on their daughter’s dress. So try it, and maybe you’ll come up with your own way, the most unique and original. After all, this is a creative and interesting process.
A bow is an indispensable accessory to a dress, a decorative element of gift wrapping and table settings, and a mandatory attribute of a school uniform. Using ribbons of different lengths, widths, colors, textures, you can get strict, lush, elegant, and unusual shapes. There are many ways to do this, which we will talk about in more detail.
Bows for gift packaging, boxes
Both decorative paper and satin ribbon of different widths are suitable for gift packaging. The only limitation is that the satin must be starched to keep its shape. Ribbons with wire are also sold; they can be used to form any flowers or patterns.
Let's start the analysis with a simple bow:
- put a motley wide ribbon;
- Place the box in the middle (face down);
- lift the edges of the material up, making them as even as possible;
- cross the ends or tie in one knot (one side of the box is tied);
- then move the edges of the tape in the opposite direction;
- turn the box over (face up);
- tie a knot (the other side is tied);
- now make a beautiful bow from a wide ribbon in the middle or diagonally (fold each edge into a loop, cross and tie);
- straighten the bow;
- the tails can be cut obliquely or in a zigzag (singe the edges if the fabric is loose).
By changing the size of the ribbon, you get different bows. If you tie the box not on both sides, forming a cross, but also take it diagonally (forming a snowflake), then a simple bow at the intersection of eight stripes will look more interesting.
Bow ear
Let's look at how to make a ribbon bow for small boxes. Such a patterned bouquet, somewhat reminiscent of an ear of wheat or a wild flower, is perfect for decorating a table for a wedding, anniversary, or business banquet in a restaurant. This stylish bow can be placed on a plate or tied to the stem of a glass or a napkin holder. In any case, the table will become very bright and original.
- Place a wide yellow ribbon and a narrow white ribbon on it.
- Tie the box with them (it’s better to glue it with a heat gun) once, that is, only one side is tied.
- Next, using special scissors (so that the fabric does not fray), cut off one edge of the yellow ribbon with a zigzag.
- Fold the resulting ribbon into a loop, determining the size of the bouquet.
- Cut the required number of satin pieces.
- Fold each ribbon into a loop and tie the bouquet in the middle with a white ribbon.
- Pull the tails through the ribbon on the box and tie a bouquet that somewhat resembles ears of corn.
For such bows, take starched ribbons or decorative paper.
Colorful decorations
If you make a bow from several colors, you can highlight the shades of a gift or product. Such bows are often used to make children's hairpins and elastic bands for children under three years of age. To make them, you need two tapes: wide and narrow. The proportions are approximately as follows: five centimeters and two centimeters or two centimeters and eight millimeters.
So, how to make a ribbon bow?
- The length of the segments must be the same.
- The ends of the wide tape are glued with tape or seared with fire.
- Next, you cover it with a narrow ribbon, which is located in the middle.
- You also glue the ends together with tape.
- You tie the middle with a narrow ribbon.
- Glue the bow to a box, hairpin or other things.
The standard wide ribbon is always light in color, while the narrow ribbon and knot are always dark in color. But you can experiment and choose the option that will look better with the product. Please note: in this master class, one bow is placed on top of another, that is, they create one whole. The following example shows how the image of a flower is created by applying ready-made bows.
Multi-colored bows: continuation
Let's figure out how to tie a ribbon bow for small boxes. It can also be used to decorate the table by tying it around the cutlery.

- Tighten the box with a wide ribbon on one side.
- Next, take a narrow dark pink ribbon and cut off a length equal to one side of the bow.
- Fold each piece into a loop and overlap each other on each side.
- It turns out two loops at the ends.
- Without letting go of the middle, attach a light pink bow.
- To do this, fold the ribbon into a bow shape, but do not tie it.
- Tie the resulting flower with a wide ribbon and attach it to the box, like a bouquet of ears of corn.
A multi-colored flower bow can be made directly on the box. The package is wrapped in a long roll of paper of the same color, and all excess is collected in a “tail” in the middle of the front side. Tied with a ribbon. Add a strip of a different color to one side and tie it into this “tail.” The ends are beautifully rounded with scissors, straightened, and a lush flower is formed.
Ribbon flower bow
The box can be decorated with a satin rose. To do this, you only need hot glue, scissors and two medium ribbons of peach and milky colors.
- Tie (or glue) peach ribbon around one side of the box.
- The other side of the box is milk.
- Cut a long piece for the rose (the longer, the more magnificent the flower).
- Holding one edge, twist the entire ribbon.
- Tie both ends into a knot (the ribbon is twisted).
- Now hold the ponytails with one hand and the loop with the other, form a rosette in a circular motion.
- Spread the petals as shown in the photo of satin ribbon bows.
- If necessary, glue the flower in several places so that the tape does not unravel. You can also make a pleated rose. To do this, fold the tape in the middle, forming a triangle. Then fold the ends one by one to form a square. Once the tape ends, hold the ends with one hand and pull the end up with the other. As a result, the fabric “shrinks”, creating rose petals. Secure the flower with glue or thread and attach it to the box.
Also make a milk rose. Try to keep all the flaws (tails, knots) at the bottom of the flower. When gluing a milk rose, make sure that the petals of one or another flower can be used to cover up any incidents.
Two lush bows in different ways
Many people think that it is difficult to make a lush flower bow out of ribbons, but this does not even require glue. A wide ribbon and scissors are enough. You tie the box with ribbons, creating a square or snowflake. Next, proceed to forming the decoration.

How to tie a ribbon bow?
- Using tape, measure the narrow edge of the box (this will be the diameter of the bow).
- Tape the end to the main tape, forming a loop.
- Holding the glued area with your fingers, wind the same loops (the more, the more magnificent the bow).
- The “windings” should be evenly superimposed on each other.
- Holding the middle of the loops, use scissors to cut off two triangles on each side, that is, the middle of the tape remains intact.
- Carefully attach the loops with the cut edges, creating a cut in the middle of the bow.
- Use a piece of another ribbon to tie the middle.
- Now take one edge with the loops in your hands and begin to straighten the petals in one direction or the other.
Lush ribbon bow: continuation
As soon as you unravel the loops on one edge, begin to straighten them on the other side. To keep the bow in shape, you need to use starched or decorative paper for the ribbon. Pull the bow pieces through the middle of the box ribbon and tie them in a knot. Cut the edges diagonally or in a triangle.
You also make another lush bow with uneven petals, that is, the flower forms several tiers.
- To do this, fold a small loop in one direction and make the same one in the opposite direction.
- Hold the petals with the fingers of one hand in the middle of the bow.
- All petals should be located strictly under each other.
- Each subsequent lower petal should be one and a half to two centimeters longer than the upper one.
- It turns out a kind of fan of petals on each side.
- Next, diagonal cuts are made in the middle, as in the previous method of creating a lush simple flower.
- This place is tied with tape and tied into a knot.
- The petals are spread throughout the circle.
The result was a gift bow made from ribbon for the box.

Universal strict bow
A strict classic bow is suitable for cylindrical, tall gift packaging, hairpins, and elastic bands. The easiest way is an ordinary bow. To do this, cut a piece of wide tape. The edges are secured with tape. Fold the petal so that the glued ends are in the middle of the loop from the wrong side. Use another piece of tape to tie the middle. It turns out to be a bow. The secret here is in the knot. The piece is taken long, and its edges are pinched on both sides (you can secure it with threads, or burn the satin with fire). But two-color jewelry is more interesting.
How to tie a bow from a ribbon of two colors?
- Cover the cylinder with medium length tape in the middle.
- The glued parts are hidden under the bow.
- From the same ribbon, make two loops: long and short.
- You can do three layers like this, but no more (otherwise you’ll end up with a dior bow).
- The difference between the loops is one or two centimeters.
- The edges of the tape are glued or secured with tape.
- Now take each loop so that the glued place is in the middle.
- The result was a bow made of petals of different lengths.
- Next, glue a small piece on the wrong side.
- Glue the wrong side to the tape on the packaging in the place where the joints are visible.
Flat bow for stationery
A flat bow is suitable for small souvenirs in the form of notebooks, notepads, pencils, pens and other office supplies. Segments are cut out of ribbons of different colors, widths, and lengths (almost like in a strict bow, only ordinary stripes).

Each side of the piece is cut in a zigzag pattern, forming a triangle notch. If necessary, burn the edges with a flame. Then fold the wide large piece first, then the narrow small piece on top of it. Tie the middle with a wide ribbon (knot on the wrong side). You straighten the bow, then tie the book or notepad with this ribbon. In general, when decorating stationery, you can do the same as with a box: first cover it with tape, then make a bow and glue it to the base.
Please note: this is not a very large ribbon bow, so three or more pieces will not match each other. But such decoration can be modified by adding volume. To do this, you need to make a lot of segments of the same length. Then glue one piece at a time onto the box, laying it out in a circle. The next row begins in a checkerboard pattern. Once you are satisfied with the volume of the product, glue a decorative bead on top.
Chrysanthemum bow
Floral bows add luxury and originality to the gift. Many people think that they cannot be repeated by an ordinary person, but making them is as simple as an ordinary flower bow. Let's take a closer look at the question of how to make a bow from a ribbon.
- Measure the tape as long as you want the diameter of the flower to be.
- Tape the end of the edge together.
- The glued area should form the middle of the petal.
- Holding it with your finger, wrap as many circles around your palm as you want to get rows of chrysanthemum.
- Cut the edge of the tape, adjust the winding (in one line).
- Holding the middle, cut a diagonal triangle from each edge of the tape.
- With these cuts you connect one edge to the other, that is, you get the cut middle of the bow.
- Tie the middle. Try not to fluff the petals just yet.
- Cut each side of the bow into four parts towards the middle.
- Now straighten all the petals in turn on each side (pull the loop to the right, then to the left, then the flower holds its shape).
Mini bow
Let's figure out how to make a ribbon bow for small gifts and cases.
- Hold the edge of the tape.
- Making a petal.
- Next, use the same ribbon to create a second bow loop.
- Without cutting the tape, twist it and pull it down.
- Make the second row of two petals.
- Hold the middle so that the loops do not fall apart.
- For the middle, take a length longer than its diameter.
- Glue the middle.
- Cut out the ends of the bow into a triangle and burn them with fire.
For hairpins, it is better to attach such bows with a needle and thread to create the most magnificent volumes. For this purpose, tapes of any width can be used.

If you need very miniature bows, then you will need a regular fork.
- Step back from the edge of the tape to the length of the intended tail.
- The right side of the ribbon should be to the right of the fork.
- Wrap the piece around the fork, placing the edge between two tines.
- Lift the ribbon up, carefully straighten it in the same groove, and drag the tip through the weave of the first end from right to left.
- Make a second knot if the first one is sloppy.
- Cut the tails at an angle.
Unusual bows
Narrow horizontal bows are suitable for long gift wrappings. This decoration, also called “dior”, resembles a strict bow in its manufacture, but still has differences. So, how to make a ribbon bow?
- You need to cut four segments, each of which is 1-2 centimeters longer than the previous one.
- The topmost element of the tape should form a circle when folded.
- Place the ends of each piece next to each other and secure with tape.
- Place the resulting loops on top of each other so that the glued side is at the bottom.
- Use your finger to hold the top round loop through which you pull the ribbon, and tie all the layers.

Original bows are obtained by combining different textures and colors of ribbons. For example, a bow made of bright orange and black polka dot ribbon will attract attention from afar. Ponytails of different thicknesses also give the decoration an unusual look.
Example
Fold a ribbon of the same color like a snake, forming 5 layers (that’s 2 petals and the same number of tails). Fold the bow on top like the first row of a mini bow. Using a narrow ribbon (3 mm), tie both bows in the middle. Then, using the same piece of a different color, you also make a beautiful knot, straighten the tails, loops, and attach it to the box.
Summarizing
All the considered methods of creating bows from ribbons are suitable for any material - organza, paper decorative ribbon and even plastic bags. When making decorative elements on gift boxes, the ribbon can be attached with hot glue or tape. But when decorating jewelry (hairpins, elastic bands, headbands), also use a needle and thread. Combine different bows from ribbons (MK is described above), creating new images for gifts for the upcoming holidays.