
DIY Santa Claus made from paper: step-by-step master classes with photos. How to make Santa Claus out of paper? DIY cuteness! Santa Claus head made from colored paper craft
Our favorite holiday is approaching - New Year. We want to create a fabulous atmosphere and festive atmosphere, and creative crafts will help us with this. In this article we will look at: how to make Father Frost and Santa Claus with your own hands.
You will need: foam ball with a diameter of 6 cm, faux fur, chabrak, bias tape, holofiber, hemispheres for eyes, pattern, snowflake sequins, sewing machine, iron with sleeve block, scissors, textile glue, blue crepe satin, white, nude and fleece blue, staff wand, silver braid.
Master Class
- Cut out 2 pieces of the body from chabrak, glue on crepe satin, then finish the long sections with bias tape.
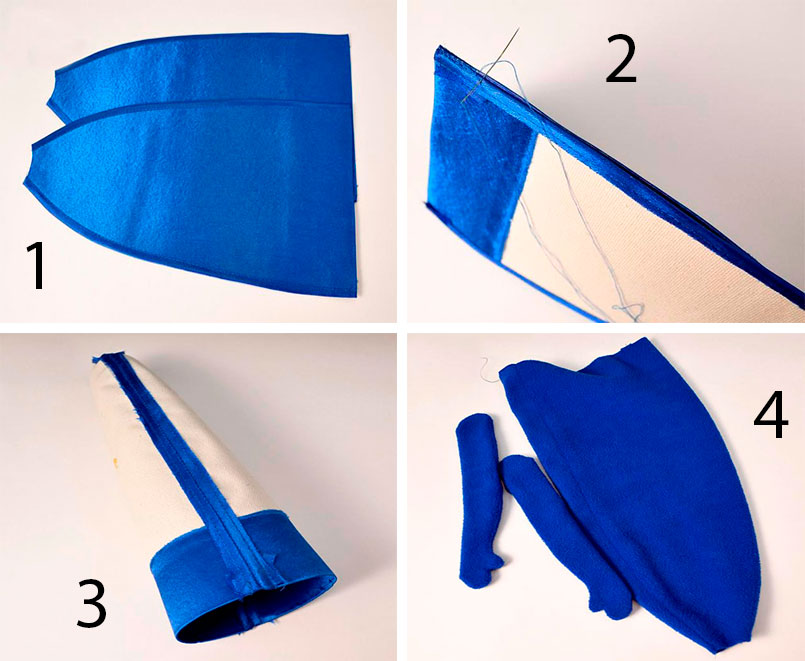
- Place the pieces of crepe satin next to each other and sew long sections with a seam over the edge.
- Form into a round shape using an iron and a sleeve block.
- Cut out the details of the fur coat and handles from blue fleece.

- Sew, turn right side out, and leave holes in the handles for stuffing.
- Cover the ball with flesh-colored fleece and create a neck by wrapping excess fabric with thread.
- Make and attach a nose, then attach hemispheres for eyes.

- Place the fur coat on the chabrak piece, insert the head into the hole in the body, then sew it on.
- Make a hat this way: cut out a rectangle to fit your head from blue fleece, sew the short side and wrap the top with thread.
- Prepare strips of fur for the lapel of the hat and the trim of the fur coat.
- Attach the blue hat with a basting stitch to the head, then sew the fur strip butt to the blue fleece and turn the fur up.

- Stuff the handles with holofiber, sew up the holes, decorate the wrists with fur and sew on the hands.
- Make a beard this way: cut out several rectangles of flesh-colored fleece with a difference in length of 1.5 cm. It is worth noting that the rectangles need to be cut so that the fleece stretches along the long side of the rectangle. Cut the fringe.
- Sew the beard pieces to the head, starting with long pieces and gradually working your way up to the nose.

- Stretch and curl your beard into curls.
- Decorate your fur coat by attaching snowflake sequins.
- Wrap silver braid around the stick to make a staff.
Gorgeous Santa Claus is ready!
You will need: red napkin, template, marker, glue, scissors, paper, printer, hole punch, twine.
Master Class

Santa Claus from a napkin is ready!
You will need: cotton wool, ice cream sticks, red felt, decorative eyes, red pompom, glue gun, flesh-colored paint, brush, scissors.
Master Class

Santa Claus made from cotton wool is ready!
You will need: felt 1 mm thick in beige, white and black, white felt 3 mm thick, thick beige cotton fabric, white felting wool, padding polyester, wire, template, black beads for eyes, black and beige threads, scissors, pencil, glue gun, small bell and other decorations.
Master Class
- Print the template.

- Cut out the body of Santa Claus and transfer it to thick white felt.
- Cut out the body of Santa Claus from felt.

- Cut out the same body part, only from thin white felt.
- Cut the boots from thick white felt, then the same boots from thin black felt.
- Cut out the boot cuffs from thin white felt.

- Draw the mittens and cut them out of thick white felt.
- Cut out parts from thin beige felt - the trim of the fur coat and hat.
- Cut 2 circles according to the template from beige cotton fabric.
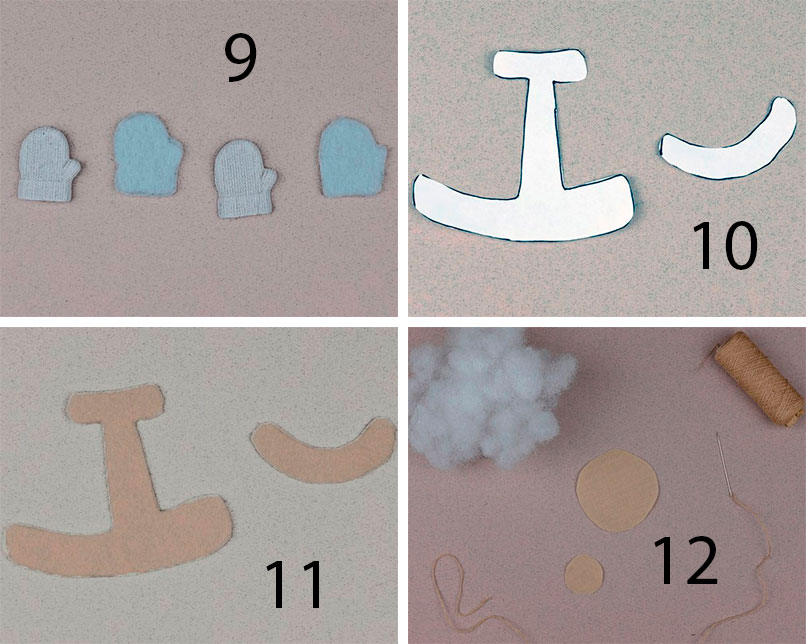
- Make a spout from a small circle: pull the thread, stuff it with padding polyester and sew the spout to the large circle.
- Sew black beads for eyes.
- Sew the face to the body from thin felt. It is worth noting that during sewing you need to add a little padding polyester for volume.

- Make the eyebrows and beard from felting wool, then attach with a glue gun.
- Glue the trim of the hat and fur coat.

- Prepare 4 pieces of wire, twist them onto a pencil, giving them the shape as in the photo.
- Glue the parts of Frost's body from thin and dense felt, gluing wire between them in place of the arms and legs.

- Glue the mittens and boots to the twisted pieces of wire.
- Twist a wire holder for a bell and glue it to the mitten.

- Stitch the Santa Claus figurine with beige thread.
You will need: bottle of champagne, hook, yarn, centimeter, edge, filler, regular threads, needle, doll strands, glue, decorations.
Master Class
- Knit the head with single crochets using beige yarn, according to the principle of knitting a ball. It is worth noting that the number of rows without increases and decreases should be two rows less than for the ball.

- Make the base of the doll from red yarn: double crochet a circle, fold it in half and make knots at a distance, as shown in the photo.
- Knit your arms and torso in circular rows that taper towards the bottom.

- Tie the nozzle onto the bottle from beige yarn and don’t forget to constantly try it on so that it doesn’t fit too tightly.
- Connect the bottom of the nozzle and the workpiece with your hands on the bottle.

- Fill the handles of the red blank and the empty space with filler.
- Dimensions: head circumference 30 cm; arm length 18 cm; body width 30 cm; body height 16 cm.

- Knit and decorate clothes.
- Clothes dimensions: hat blank diameter 10 cm; sleeve length 12 cm; fur coat length 28 cm; sleeve volume 18 cm; fur coat volume 47 cm; The circumference of the finished hat is 32 cm.
- Sew the clothes with regular threads, the sewing lines are indicated in the photo.

- Attach the doll strands to the yarn and secure with glue. Make a beard from long strands, and use shorter strands for your hairstyle.

- Glue the hat to your head.
You will need: red cardboard, flesh-colored paper, 2 openwork napkins, scissors, marker, pencil, glue.
Master Class

Santa Claus from an openwork napkin is ready!
You will need: bright and flesh-colored cotton fabric, white and red fleece, felt, padding polyester or holofiber, combed tape (wool for felting), foam rubber, felting needle, thick and thin wire, glue gun, Moment-Crystal glue, thick cardboard, acrylic paints and brushes, wire cutters, pliers, stationery knife, buttons, beads, beads, floss.
Master Class
- Make a pattern from cardboard: cone with sides 13 cm; circle with a diameter of 6 cm and handles (optional).
- Draw a line through the center of the circle and divide it into 3 equal segments, then make holes for the wire at their joints.

- Place a padding polyester circle and a slightly larger diameter cotton circle on the cardboard circle, then pull the fabric around the cardboard using thread and a needle as shown in the image.
- Bend a thick wire into the letter P, then insert it through the holes in the cardboard, padding polyester and fabric.
- Bend the ends of the wire so that you get feet.

- Prepare a piece of thin wire 25 cm long and screw it to a thick wire, then glue it with hot glue. At this stage, make sure that the structure is stable.
- Prepare 2 pieces of cotton fabric 22 cm long and 4 cm wide. Fold in half lengthwise, sew, turn out, pull over the legs and sew with a blind seam to the bottom.
- Make a cone pattern from flesh-colored fabric, fold it in half, sew, leaving 2 mm of the tops unsewn, fold the edge around the circumference, baste and turn the cone out.
- Place the cone on a thin wire, leading its end through the hole in the top. Stuff the cone with holofiber so that the wire is in the center of the body, then sew the folded edge to the body around the circumference with a blind seam.
- Cut out large feet from cardboard, then hot glue them to the wire feet.
- Cut the boots out of foam and make a recess in the back for the ankle wire, then attach them.

- Cut 2 ovals from red fleece, cut a triangle at the top, cover the foam boots, sew the heel with a blind stitch and pull the fleece around the cardboard sole.
- Cut 2 felt ovals slightly larger than the cardboard sole, hot glue them to the sole, trim off the excess and sew the felt to the fleece with a blind stitch.
- Mark the lines for the top of the jacket and the bottom of the cap on the cone, then roll a padding polyester ball, cut a circle from the fabric, pull it along the edge and sew the nose in place.
- Draw a face to your liking.

- Cut the red fleece jacket into a truncated cone shape, fold it in half, sew along the edge, then turn it inside out.
- Sew handles and gloves from red fleece and cotton fabric as shown in the image.
- Pull the jacket over the body-cone and sew at the bottom and along the neck with a hidden seam.
- Cut out figures from felt - Christmas trees, houses, then glue them with Crystal glue and only then sew them on as desired.
- Sew a white fleece snowdrift ribbon with a hidden seam and decorate the composition with beads and buttons.
- Cut boot cuffs and cuffs from white fleece, fold in half, sew along the edges, stretch over the arms and legs, then hand sew. Make a wavy collar in the same way.

- Sew the arms to the body using a button fastening: pull the thread a little, tie a knot and glue it with Moment.
- Tear 10 cm of wool from the combed strip, gather it into a bun and felt the beard with a felting needle.
- Tear off a bunch 2 times thinner and 2 times longer, then roll it in place of the mustache.
- Tear off 2 more bunches as for the beard, then roll on both sides of the face.
- Felt the hair on the sides and back of the head in the same way.
- Cut out an elongated and narrowed cap from cotton fabric based on half a cone, sew it together, leaving a hole at the top.

- Turn it inside out and put the cap on, bringing the wire through the hole and sew it along the edge to the head. Bend the end of the wire into a loop.
- Make a pom pom and flap out of white fleece, then sew them on.
- Make a small felt Christmas tree and glue it to the hat as a decoration.
You will need: red and white colored paper, scissors, glue, marker, pencil, wooden bead.
Master Class

Santa Claus from a plate
You will need: paper plate, colored paper, scissors, glue, marker, printer, eyes, hole punch, rope.
Master Class

You will need: box, colored paper, scissors, glue, marker, pencil, button, eraser, envelope.
Master Class

You will need: plastic bottle, paints, colored paper, pompom, scissors, buttons, 2 bushings, glue, cotton wool, white and black lace.
Master Class

Santa Claus from a bottle is ready!
You will need: white and red paper, scissors, template, printer, pencils or markers.
Master Class

Creative grandpa is ready!
You will need: cotton pads, plastic spoon, glue, red yarn, buttons for eyes, ribbon or thread for hanging, red felt-tip pen, scissors.
Master Class
- Take a cotton pad.
- Fold its side into the center.

- Make cuts along the edge of the circle.
- Draw a smile with a felt-tip pen.
- Take a plastic spoon.

- Apply glue to the spoon, leaving the tip without glue.
- Wind the yarn tightly.
- Apply glue on both sides to the tip of the spoon and glue the face of Santa Claus to the convex part.

- Glue a clean cotton pad onto the concave part of the spoon.
- Cut a circle out of a cotton pad and glue it onto the tip of a spoon handle.
- Cut a circle from a cotton pad, color it with a felt-tip pen and glue it as a nose.
Well, what's the New Year without Santa Claus? Paper is the most affordable material for making New Year's crafts. It is from paper that we will make the main character of the New Year.
To make Santa Claus you need:
Paper for printing templates (it is better if it is thick enough);
Scissors;
Glue, brush
Step-by-step process for making Santa Claus
1. Print the templates on a printer.

2. Cut out all the details of the craft.
.jpg)
3. Bend Santa Claus' fur coat along the fold lines.
.jpg)
Glue the edges of the fur coat and the top part at the allowances.
.jpg)
4. Bend along the lines of the sleeves and glue them together.
.jpg)
5. Glue the sleeves to Santa Claus’ fur coat (gluing points A and B).
.jpg)
.jpg)
7. Bend the collar along the fold lines and glue its edges together using the allowance.
We put the collar on the fur coat.
.jpg)
8. Take the “face of Santa Claus” detail and use a brush to twist the beard so that the beard “curls”.
.jpg)
9. Glue the face of Santa Claus to the fur coat (gluing location B).
.jpg)
.jpg)
10. Santa Claus is ready!
.jpg)
This toy will be an excellent decoration for the New Year's interior or a gift.
You don’t need to look for a special reason to practice with children, because it helps mental development and the formation of useful skills in smart kids. But the theme of all kinds of crafts may differ depending on the season, the child’s mood or upcoming events. So, New Year is the most long-awaited holiday of the year. Absolutely all children remember him as soon as the first cold weather arrives. Naturally, interesting New Year's creativity helps brighten up the anticipation of a bright holiday.
In this article we will tell you how to make a paper Santa Claus from a cone with your own hands; the master class is provided for the convenience of creating crafts together with children. Primary schoolchildren will be able to make such a souvenir, but children of kindergarten age will need the help of adults. Follow the tips to spend time with your children fun and easy.
A funny paper Santa Claus made from a cone is made from the following materials:
- a small sheet of cardboard, preferably one side of it is white;
- scissors;
- scraps of red, white, black and yellow paper;
- glue and stapler;
- white napkin;
- a piece of fabric and thread.
Step-by-step tutorial on how to create a paper Santa Claus from a cone with your own hands
1. Prepare a thick sheet of cardboard in the desired format. The height of the paper Santa Claus will depend on its width.

2. Roll a piece of paper into a cone. For quicker and more secure fastening, use a stapler.

3. Wrap a small piece of red paper around the top of the cone to make a blank for Santa's hat. Cut a rectangle from a ribbed white napkin.
By the way, if you are interested or would like to try your hand at the modular origami technique, then we suggest you make something like this.

4. Roll the rectangle into a tube and glue it to the bottom edge of the hat to imitate white fur.

5. Cover the bottom of the cone with red paper, but leave a white gap between the fur coat and the hat.

6. Glue black dots – eyes and a red nose – onto the front part of the paper Santa Claus from the cone. Also frame the lower part of the fur coat with a napkin tube.

7. To make hands, use red paper, roll it into a tube and decorate it with fur from a white napkin.

8. Create a strap from black corrugated paper and a yellow square, and buttons from black circles.

9. Use PVA glue to attach the colored paper Santa Claus sleeves.

10. Make a mustache and beard from white pieces of paper and attach to the craft to complete the look of Santa Claus.

11. Now the funny paper Santa Claus from the cone is ready to take pride of place under the small New Year tree. Be sure to make a small bag out of a piece of fabric secretly from the child and put candy in it.

And from cardboard you can make something like this
Print Thank you, great lesson +0
New Year's mood can be lifted in many ways. For example, make a three-dimensional Santa Claus out of paper with your own hands for the New Year from scrap material. We also have a lesson
Just 15 minutes and you will be in the mood, and you will also have a finished craft in your hands, made with your own hands from colored paper.

- Red and white double sided paper
- Red store-bought pompom
- Stationery glue
- Simple pencil
- Marker black
- Scissors
Step-by-step photo lesson:
We will make the body of Santa Claus in the form of a cone. To make such a geometric figure, draw a circle on red double-sided paper. You can use a compass or circle a plate. Cut it out. Bend in half. Open and cut along the fold with scissors. We get two halves. For one Santa Claus figurine you will need only one part.

We twist half of the circle and get a cone-shaped figure. Secure the edges with glue. The lower parts can be adjusted with scissors to give an even base.

Then we draw a beard on white paper.

Cut out the beard along the contour. Cut through the middle to create a horizontal slit. We “dress” the beard through the slit. Bend a small part forward to create hair.

Glue the red pompom to the highest point of the cone. This will be the bubo of Santa Claus's hat.

Glue the plastic eyes. Cut out a mustache from white paper, and a small circle from red paper. Glue the cut out parts just below the eyes. Use a marker to add brightness and clarity.
We talked about how to make Christmas trees with your own hands in our last article >>>> As you know, it is customary to put gifts under the Christmas tree, and, of course, Grandfather Frost brings them. Therefore, in this section we will tell and show how to make another popular New Year's craft - Santa Claus from paper. Here you will find a large number of ready-made paper crafts for the New Year. All you need to do is print out the pattern you like, cut it out and glue the craft according to the instructions. Santa Claus-matryoshka, Japanese Santa Claus, dancing Santa Claus, Santa Claus in a reindeer harness, Santa Claus cap and beard, Santa Claus mask, Santa Claus finger puppet, Santa Claus bag, as well as Santa Claus's vehicles (sleigh, bus, train , airplane) - you will find all this in our article.
1. DIY Santa Claus made from paper (option 1)
Homemade Santa Claus - matryoshka. It consists of boxes of different sizes with the image of Santa Claus, which can be nested into each other according to the matryoshka principle. Very easy to make. This paper craft for the New Year can be used as an educational toy.
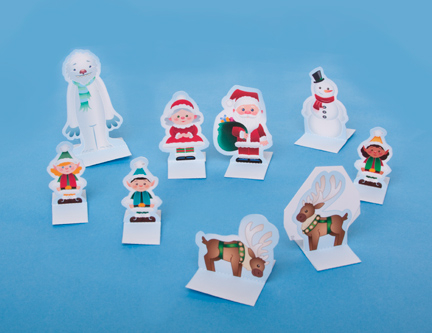
2. DIY Santa Claus made from paper (option 2)
Santa Claus in company with the Snow Maiden, Snowman, Sasquatch, deer and Elves.
3. Paper Santa Claus (option 3)

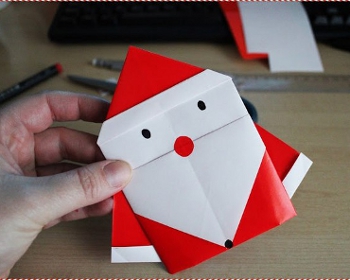
4. Origami Santa Claus (option 4)
For this New Year's craft, you will need a square sheet of paper, red on one side and white on the other. For detailed video instructions, see the link.
5. Homemade Santa Claus (option 5)
Miniature Santa Claus from our favorite website CREATIVE PARK from CANON. You can put it on the table, or you can hang it on the Christmas tree as a homemade Christmas tree decoration.

Dancing Santa Claus from the same site. See link >>>>
Santa Claus in a reindeer sleigh >>>>


Santa Claus hat with beard >>>>

6. Homemade Santa Claus (option 6)
Paper Santa Claus on a sleigh >>>>

7. How to make Santa Claus with your own hands (option 8)
DIY finger puppet Santa Claus made of paper. On the same site you will find a Deer finger puppet. Now you can show a New Year's puppet show.

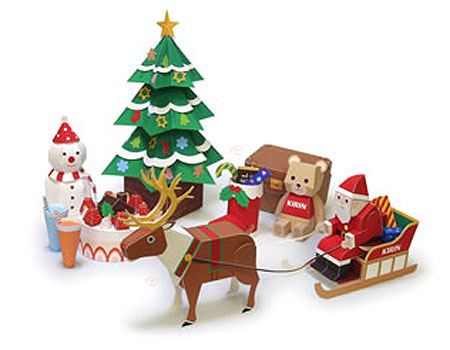
8. How to make Santa Claus out of paper (option 9)
A whole New Year's scene from the Kirin website: Santa Claus in a reindeer sleigh, a Christmas tree, a snowman, a chest with gifts, etc.
9. How to make Santa Claus out of paper (option 10)
Another homemade Santa Claus made from paper. This paper craft for the New Year is very easy to make.

10. DIY Santa Claus made from paper (option 11)
New Year's paper craft - cheerful Santa Claus on a sleigh. You can download the craft diagram from the link >>>>

11. DIY Santa Claus made from paper (option 12)
The highlight of this New Year's paper craft is that the paper Santa Claus is in a sitting position. It can be placed on the edge of a bookshelf or table, for example. An original DIY New Year's craft from the Disney website FamilyFun.
