
Detailed description of knitting bactus. Bactus knitting: patterns and descriptions of knitting for beginner knitters. What's so special about this seemingly simple scarf?
The triangular bactus scarf was once an integral part of the national costume of one of the northern peoples, and now a favorite item of clothing for women, men and children in the cold season all over the world. With the help of bactus you can not only protect your neck and chest from cool winds, but also diversify your usual outerwear. Several types of bactus in your wardrobe will give you room for imagination and inspiration in uncomfortable times.
The easiest way to get your hands on a special bactus is to tie it yourself. We are ready to help with this by offering several options for patterns and descriptions of knitting different models of this beautiful and warm scarf.
How to knit bactus with knitting needles?

Not only professionals can knit bactus; even a beginner can knit this original scarf. The simplest knitting is suitable for this - garter stitch. The length of the bactus triangle varies, from 40 cm to 140 cm, depending on the idea. The average width of a bactus can be from 25 to 45 cm. After all, it’s easy to make a shawl or an openwork scarf from a simple scarf—you just have to want it.
Master class for beginners

Before you start this, remember: beginners are lucky. Moreover, in such a useful matter! Let's first try to knit a bactus in garter stitch 180x50 cm. The knitting density will be 18 loops/32 rows = 10/10 centimeters.
Popular articles:
For our bactus for beginners you will need:
- 300 grams of yarn - wool or wool/acrylic (100 m./50 grams)
- Regular knitting needles (if you want to sew later) or circular knitting needles - 4 cm
- Hook 4.5 mm - optional
Baktus knitting - diagrams and descriptions for beginners:

Let's start knitting from the main edge (the top point of the pattern).
You need to cast on 6 stitches, knit 3, purl 1, knit 3. We knit further according to the pattern, starting from row 1.
From the 1st to the 6th rows we knit according to the pattern: that is, on both sides of the knitting, in each front row we increase the number of loops by 6: in each front row we make yarn overs and increases.
We knit in this way to the required length - 180 cm, after which we close the loops.
To decorate the bactus with tassels in the corners of the scarf, you will need 80 pieces of yarn 30 cm long. These will make 3 tassels 15 cm long.
To make a crochet stitch, you need to leave the loops when there are 373 loops on the knitting needles (123 row) and crochet like this: 2 sts from the knitting needle we knit SS, then raise the stitch and make 1 picot (3VP, 1SC in 1VP) - like this repeat 60 times. Finish the second half of the bactus in a mirror image
Openwork scarf

Openwork bactus with knitting needles is worth the painstaking work on it. After all, this beautiful and stylish thing will decorate and protect you or your loved ones during the most uncomfortable time of the year. Such an original scarf model as the openwork one will suit almost any outerwear and will be an excellent addition to your wardrobe.
Our openwork scarf will be 127 cm in length, 56 cm in height, legs - 84 cm.
Knitting density: 16 loops/20 rows = 10 cm in stockinette stitch
For an openwork triangular bactus you will need:
- 4 skeins of yarn 90 m/50 g: 40% alpaca, 40% merino, 20% silk
- Circular knitting needles - 5.5 mm
Openwork bactus with knitting needles - diagrams and description:
The diagrams shown only show the right half of the shawl knitting and the center loop. The diagrams are read from right to left - up to the central loop. We knit the second half in a mirror image from left to right. Pattern repeat is indicated by a green frame. As rows 1-12 of the Bodi pattern are repeated, the number of repetitions of pattern repeat in width will increase. The Bodi and Set Up patterns do not show purl rows; they need to be knitted like this: k2, purl. - until the last 2 loops - k2.
First we knit according to the Set Up pattern, then we go to the Bodi pattern, and finish with the Springtime pattern.
Using an auxiliary thread, crochet a chain of 4 loops. Using knitting needles with the main gray thread, pick up k1. loop in each of the two tubercles on the back of the chain.
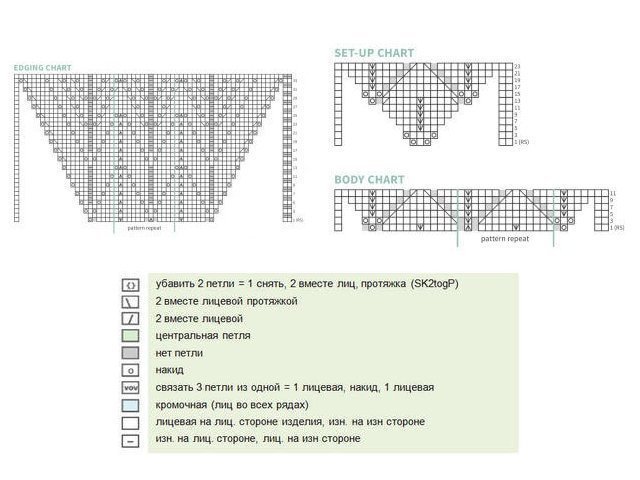
- Rows 1-6 are knit.
- Row 7: K2, turn work and pick up 1 stitch in each of 3 edge stitches, remove auxiliary thread, place 2 open stitches of cast-on row on left needle, k2. (Total 7 p.)
- According to the Set Up pattern, knit rows 1-24 (=51 sts).
- According to the Bodi pattern, knit rows 1-12 4 times (167 sts).
- According to the Edge pattern, knit rows 1-34 (1 time).
Close off all the stitches with knit stitches. We remove the ends of the threads. The scarf is ready.
Knitting pattern with scalloped edge

Another option for a triangular scarf that can be knitted is bactus using knitting needles with a scalloped edge. Beginning needlewomen will also be able to make such a beautiful warming item for themselves or their loved ones using a simple and detailed knitting pattern.
The length of the future bactus with jagged edges will be 145 cm, width – 28 cm.
For jagged bactus you will need:
- A skein of acrylic threads (both melange and plain yarn are suitable)
- Knitting needles No. 4
Bactus with cloves - description
First we dial 4p, then we knit in rows:
- No. 1: edging (hereinafter edging), from 1 stitch we knit 2 (that is, from 1 stitch we perform the front one behind the front wall and behind the back wall), knit., edging..
- No. 2: chrome, faces. – 2 pieces, from 1 we make 2, chrome, air (hereinafter referred to as air)..
- No. 3: edge, from one - two, to the end of the row of faces, and then 1 edge..
- No. 4, 6: 1 edge, knit, from 1 we perform 2, knit. and air..
- No. 5, 7: knit the same as in 3 p..
- No. 8: close off 5 p., knit, from 1 p. 2, knit. and air..
We repeat the pattern from 1 to 8 r.
When there are 144 stitches on the knitting needles, the number of gear parts should be 21 pcs.
How to knit a scalloped edge:
- remove the loop and make 2 knit stitches.
- remove chrome, faces, chrome..
- edge, faces - 4 things..
- remove the edge, faces. – 3 pcs., chrome..
- edge and 6 front ones.
- repeat 4 p., but instead of 3 persons. do 5.
- according to the same pattern as 5 p., but at the end there are 7 persons.
- the same as 6 rubles, but one face more.
- close 7 p., knits. - 2 pcs..
Next, following the description, repeat all rows from 2 to 9.
Important:
the penultimate jagged part on the edge should be knitted not with 7, but with 6 stitches.
The last gear part consists of 4 r.. It is knitted. P..
At the end of the loop you need to close.
A bactus with a jagged edge is an interesting model that was probably in every grandmother’s chest, and now you can continue the tradition and knit this beautiful and timeless accessory for yourself or your loved ones.
Video lesson
In order to make knitting a bactus easier for both beginners and those needlewomen who have never knitted a triangular scarf before, you can use diagrams, photos and videos and help yourself cope faster if you study the process with an example. Video tutorials are perfect for this.
Video “How to knit bactus with knitting needles: diagram and description”
There are many models, patterns and descriptions of how to knit a bactus - a triangular neckerchief. Here are the most interesting and popular models. Let's start with the simplest option - a triangular scarf in garter stitch.
The simplest triangular scarf can be knitted yourself using regular garter stitch. It will look impressive and stylish.

To work on this model you need to prepare:
- Yarn. It can be half-wool, wool, acrylic or cotton. It shouldn't be thin. Approximate footage – 150-200 m per 100 g.
- Knitting needles No. 3.5 or 4.
Knitting needles can be used on a fishing line or regular straight ones.

You need to knit like this:
- Cast on 4 stitches as usual.
- Knit the first and second row with knit stitches. In this case, remove the edge loop; it will need to be removed at the beginning of each row. Purl the last stitch. This must be done in all rows. Knit the remaining stitches in any row.
- You need to start increasing from the third row. Increases must be made in every second row immediately after the edge loop: remove the edge loop, knit a knit stitch from the broach, continue knitting all the loops of the row. For convenience, you can hang a marker near the side of the bactus where the increases are made.
- Knit the next row without changes.

Make such additions until the width of the shawl reaches the desired width. Usually this is about 30 cm, but you can do as much as you want. Then immediately start decreasing. Do them the same way in every second row on the same side. The marker can be moved closer to the edge of the knitting.
On a note!
You need to decrease after the edge at the beginning of the row, knitting the second and third loops together with a knit stitch. And knit the next row in the same way without changes. Alternate rows until there are 4 stitches left on the needle. Knit 4 loops 2 rows and bind off the loops.
Learn more about how to knit such a bactus with knitting needles, a description of the increases and the simplest pattern for beginners in the video below.
This is one of the basic ways of knitting bactus. It can be used to knit such an accessory with any pattern. It can be either openwork or jacquard. The main thing is to follow the principle of knitting from one corner to another with expansion and decrease from one edge.
Bactus with color transition, connected from the center
The peculiarity of this model is that it is knitted from the center and has beautiful color transitions due to the use of a special thread.

To work on this bactus you need to prepare:
- Section dyed yarn. It could be Alizée superlana batik, like in the video. You can choose a similar one. This pattern can be knitted from wool blend or cotton.
- Knitting needles No. 3. These can be knitting needles on a fishing line. They are more convenient to knit, as the fabric expands quite strongly.
You may also need beads to decorate the ends of the bactus to match the threads.

The finished product is a triangle, in the center from the base to the top of this triangle there is a row of 1 loop, which will always be knitted with stockinette stitch, and on the sides of it there will be holes from yarn overs for expansion. The shawl pattern is simple - it is an alternation of the front stitch and rows of holes, which are framed by rows of purl loops.
On a note!
Knitting begins from the center of the base of the triangle and, due to increases along the edges and in the center, the bactus fabric expands. Increases are made along the edges of the shawl in each row (both in the front and back rows), and in the center only in the front rows on both sides of the central loop.

The work is done like this:
- Cast on 2 loops and knit 5 rows. Then, going back along the knitted strip, pick up 7 loops. Thus, there should be 7 loops on the knitting needle. They need to be distributed as follows: 2 outer loops, 1 loop of the first part of the main fabric, which will expand, 1 central loop, 1 loop of the second part of the main fabric, which will expand, 2 outer loops. For convenience, you can put markers, but after several rows of knitting it will be noticeable which loops are which.
- Next, knit like this: in the front rows, knit all the loops with the knit stitches, in the purl rows, with the knit stitches, except for the two extreme ones on one and the other side of the shawl, they are always knitted with the knit stitches. Increase after the first two stitches and before the last two stitches from the broach in the front and back rows. In the center on both sides of the central loops, make increases with yarn overs only in the front rows.
- After a few rows, if desired, you need to change the pattern and knit a row with holes. To do this, on the wrong side you need to knit 1 row with facial loops to form a voluminous track on the front side. In this case, increase as usual and knit the outer loops as usual. In the front row, after the first two loops and increases, knit like this: 2 together, yarn over to the center loop. In front of it, make a yarn over, knit the central loop, make a yarn over and continue 2 together, yarn over to the outer two loops. From the wrong side, knit all the stitches.
- Next, move to the front stitch.

So alternate several rows (if desired) of satin stitch and rows with holes. At the desired width of the shawl, you need to knit several rows of garter stitch (only with knit stitches) before closing the loops, while observing all increases. Close the loops.
The ends of the bactus can be decorated with tassels or beads if desired.
Read more about how to knit this bactus with knitting needles with a decoding of the pattern and description in the video below.
This is the second basic principle of knitting bactus. This can include any pattern or alternation of patterns, jacquard, lace, stockinette stitch or garter stitch.
Bactus “Lilac distance”
This model is interesting for its jacquard pattern. It is suitable for those who already have knitting skills. Despite the apparent complexity, knitting such a bactus is quite simple.
On a note!
According to the principle of execution, it is a little similar to a regular bactus, which is knitted from one corner to the center and to the other corner with expansions and decreases on one side. This video shows how to start knitting and where to increase.


To work on this scarf you need to prepare:
- Threads DROPS ALPACA from Garnstudio or similar 50 g each in caramel, pink, lilac and off-white.
- Knitting needles on fishing line No. 3.5.
The difficulty of the work lies in knitting the jacquard pattern. It must be knitted so that on the wrong side all the threads are tightly knitted into the pattern. The video shows how to knit a mosaic from threads of different shades and how to hold and weave the threads from the wrong side when changing colors.

You need to start knitting with a caramel-colored thread, from the edge of the shawl where the stripes go:
- Cast on 4 loops with caramel thread on the knitting needles and knit in straight and reverse rows in stockinette stitch, adding 1 loop in each front row from one edge until there are 63 loops on the knitting needles.
- Continue knitting in this way, while starting to knit strips, changing the thread to a different shade in this order: 2 rows (front and back) with pink thread, 4 rows with caramel-colored thread (alternate until there are 72 loops on the knitting needles); 2 rows with purple thread, 4 rows with caramel thread, 2 rows with purple thread, 2 rows with pink thread, 4 rows with caramel thread, 2 rows with purple thread, 4 rows with caramel thread (alternate until there are 92 stitches on the needles).
- Knit 2 rows with pink thread = 93 loops. Next, knit alternating pink and caramel threads according to pattern A3 (1 loop), A4 (18 loops), A5 (12 loops for the next 72 loops) and the penultimate loop according to pattern A6 and the last one according to pattern A3. Knit all the diagrams in this order once. There are 105 stitches on the needles.
- Continue knitting stripes, increasing to the center of the shawl and then decreasing from one edge. Alternate stripes like this: 4 rows of caramel thread, 2 rows of pink, 2 rows of purple, 4 rows of caramel, 2 rows of purple, 4 rows of caramel, 2 rows of purple thread.
- Knit 2 rows (knit and purl) with purple thread. Next, move on to knitting a mosaic using off-white and purple thread. Knit according to the patterns in this order: A 3 (1 loop), A4 (18 loops), A5 (96 loops - 8 repeats of the pattern), A6 (1 loop), A1 (1 last loop). Repeat the diagram 2 times in height.
- Finish knitting: 2 rows with caramel thread, 2 rows with pink and 2 rows with purple thread. Close the loops.

You can knit a hat to this bactus using threads of similar colors and a mosaic pattern.
Using the given description and diagrams, you can knit such a chic bactus as in the photo in a couple of evenings.
Serrated edge

The next model is interesting for its frame. A description and diagram of how to knit this bactus with a jagged edge with knitting needles is given below. The scarf is knitted in short rows. Shown in detail in the video below.

You can knit from any thread. The sample shows DROPS KID-SILK in 3 folds. Knitting needles can be used on fishing line or straight No. 6.
Start knitting like this:
- Cast on 3 loops and knit according to pattern A1. Repeat it 1 time.
- Then use scheme A 3 the required number of times.
- Schemes A 2 and A 4 show shortened rows.
- Finish knitting according to pattern A 5.
After the shawl is ready, it needs to be moistened and blocked. Stretch to dry so that all the cloves along the edge are even.
Bactus in garter stitch with crochet scallops

The cloves along the edge of the bactus can be crocheted. The following is a diagram and description of how to knit bactus with knitting needles and make a crochet tie.
To work you will need:
- Yarn DROPS KID-SILK from Garnstudio in 3 ply or similar in meter.
- Knitting needles No. 7 on fishing line or straight, hook.
Interestingly, picot along the edge of a shawl can be made in two ways:
- Crochet, tying the already closed edge with double crochets according to this pattern.
- Knitting needles, as in the video.
Bactus is knitted from the center of the base of the triangle using garter stitch. Yarn overs are made on both sides of the central loop only in the front rows. Yarn overs are made along the edges in each row to expand the fabric. This method is described in more detail in the article above.
The cold weather has already arrived and everyone has an irresistible desire to warm themselves. Needlewomen do not sit still and make themselves all new warm accessories. We have prepared an article about bacti especially for beginners and experienced needlewomen. Let's figure out what it is, how it is knitted and what threads and knitting needles are suitable for the product.
Bactus is a long scarf in the shape of a triangle. The history of the accessory originates in Norway. Previously, bactus was part of the Norwegian men's folk costume.
This thing is quite universal. A warm bactus made from thick yarn will keep you warm in winter. You can knit demi-season models that will not only protect from cold gusts of wind, but also add brightness to the image. In summer, an openwork accessory will be a great accent.
Usually a simple bactus is knitted in garter stitch. The classic model is quite simple to make; even a novice needlewoman can easily handle it.
More experienced knitters can use their imagination and make a completely unique bactus. You can choose any pattern, yarn, color - wherever your imagination takes you.

Simple bactus for beginners
The work will not seem difficult even to novice craftswomen who are at least familiar with garter stitch. You just have to be patient, since the length of the product reaches 1.5 meters.
So, we will try to make the description as detailed as possible.
- We start by casting on 4 loops.
- Now we turn the knitting needle over and begin to knit the knit stitches.
The side loops must also be front loops, otherwise the edges of the product will not be neat.
- In the same way you need to knit 4 rows.
- On the 5th row we make an increase “from the broach”. This is how a new loop was formed.
- All 5 loops need to be knitted in knit stitch.
- Then continue in the same way. Don't forget to add a stitch every 4 rows.
- Having knitted half the required length, you need to start decreasing the loops.
- To make the corner sharp, knit 4 rows in the middle after the last increase, and then start decreasing the loops.
- If the corner is supposed to be rounded, you should knit 10 rows in the middle without any increases. And only after that start decreasing.
- Decreases are made like this: in every 4 rows, the second and third loops are knitted together.
- Now we decrease the loops until there are 4 loops left on the knitting needle.
- All that remains is to close off the remaining loops.
Important! Decreases and increases should be on one side of the product.
Perhaps nothing complicated, the main thing is not to make mistakes in counting the rows and loops. A special row counter, which can be purchased at any craft store, will help a little with this.
Openwork bactus
If you can knit a simple bactus without any problems, you can proceed to more complex, openwork models. To do this, you need to study several schemes and get to work.
If it is still difficult for a beginning needlewoman to master a completely openwork bactus, you can start with a product with an openwork edge. The main thing is to follow the diagrams exactly.


Bactus with serrated edge
If you don’t like openwork, but simple models are not interesting either, diversify your wardrobe with bactus with a jagged edge. Let's describe one model. Prince knitting is similar to regular bactus, but edge and air loops are added.

So, the length of the stylish scarf will be 145 cm, and the width of the middle will be 28 cm. We then follow the diagram:

What threads and knitting needles are suitable?
Suitable for warm bactus:
- melange yarn of medium thickness;
- acrylic+wool 50/50;
- acrylic 100%;
- wool+acrylic 75/25;
- wool+cashmere+acrylic (50/45/5).
It is usually needed about 200-300g per product. Here it is good to knit with needles number 3, 4 or 5.
For openwork bactus you need thinner yarn:
- cotton (45) + acrylic (42) + polyamide (13);
- viscose 100%
The consumption in this case will be about 100 g per product. Knitting needles No. 2, 2.5, 3 are quite suitable.
The number of the required knitting needles is usually indicated on the wrapper of the skein of thread.
If you have knitting needles without a number, it’s easy to find out. There are special dimensional grids - cardboard or plastic sheets with holes of different diameters. Under each of them there is a corresponding number. Which hole the knitting needle fits tightly into is its number.
Part of the ancient folk costume for men in Norway is the bactus. This wardrobe element has found its role in today’s times. This is a fairly versatile item that you can easily knit with your own hands. It is worth consciously approaching the choice of shape, pattern and color.
Option "Breakwater"
To knit this product, use the diagrams and descriptions for knitting bactus. So, prepare a yarn of medium thickness. The value of 150 or 200 g depends on the length of the future product. Prepare a marker and knitting needles No. 3, 4.

You can distinguish the following varieties, as can be seen in the photo of knitting bactus.

The front surface is used for these purposes. This means using exclusively knit stitches in the knit rows. In purl rows it is necessary to use purl loops.

The next option is to use purl stitch. It is performed in the opposite order to the previous type. That is, purl loops are used in the front rows, and knit loops are used in the purl rows.


If you are interested decor We suggest visiting the website of our partners.
Description
It is worth considering in more detail the instructions on how to properly tie bactus. The process occurs in three steps, each of which has its own characteristics and distinctive points. They are worth paying attention to.

During the first stage, the mating process begins. Use simple knitting patterns for beginners to ensure the product turns out the way you planned. Over time, you can complicate the technique, improving your skills.

Cast on 3 loops, knit row 6 in stockinette stitch. Then add 1 stitch inside and place a marker. After this, you should change the pattern, knit 6 rows with purl stitch. At the end, do not forget to repeat the previous step - add 1 loop.

It is necessary to repeat this step-by-step knitting of bactus with your own hands until the product reaches a length of 40 cm. You should be careful, add one loop on each side, alternate different types of satin stitch.

The next step is to obtain a rounded profile. To achieve this effect, you need to add 1 loop inside in the 4th row. On the outside, 1 loop should be removed. The length of subsequent knitting should be approximately 30 cm.

The last stage is to achieve even greater inversion. To do this, you need to close 4 loops at the beginning of the 6th row. Then you should add 1 loop. The increase occurs at the end of the row in even numbers, at the beginning - in odd numbers of rows. The result is aesthetic, attractive teeth.

After this, you need to tie the product to the length you need. Close the loops using knitting needles No. 4, a beautiful and original scarf is ready.


Simple options
It is worth noting that bactuses made in the classic style are made using garter stitch. In this case, all loops are knitted with facial loops. Carius is knitted with stockinette stitch, for example. This is one of the interesting varieties of triangle.

The advantage of such models is that in cold or rainy weather they will definitely keep you warm. This product is universal, suitable for both parents and children.

For beginners, the process is not difficult. To do this, you need to familiarize yourself with the master class on knitting bactus. In general, to knit a stylish, quite beautiful charm you will need approximately 1 - 2 skeins of yarn. For knitting, the best option for knitting needles will be No. 4, 5. The positive thing is that the fabric rises quite quickly during the process.

Note! You should not knit on thin spitz dogs. This is unacceptable for knitting bactus, as tight knitting looks a bit rough. It is not able to form soft folds, which makes the product uncomfortable to wear.


During knitting, you should guide the needles from the tip to the center, gradually moving to the other end of the scarf.

Experienced experts advise beginners to pay attention to the following nuances. It is necessary to make yarn overs in order to increase the fabric, knitting with rolled knit stitches in the purl rows. Use a centimeter to measure the exact middle of the product. The optimal width of bactus is considered to be 28-30 cm.


If you are interested in a detailed overview of modern home appliances, we recommend visiting the Internet resource: tehnikaportal.ru
The product is quite fashionable, it can complement not only a winter look, but also a summer one. It is necessary to combine stylish details and show imagination.

conclusions
A truly beautiful and versatile product that is a must-have in your wardrobe is bactus. There are many options for its manufacture. Use the diagrams and follow the advice of the masters to ensure that your product is the best.

Choose the technology that suits you and make your dreams come true.


Photo of bacti with knitting needles


— an original accessory for adults. But why only for adults? Baktus, this knitted triangular scarf, thanks to its interesting shape, has long become a worthy alternative to a regular scarf. Bactus is convenient to tie around the neck under a jacket or coat, or to wear as an addition to a sweater, blouse, etc. Parents of avid little fashionistas are concerned with the question: how to knit a baby bactus? This is what our master class will be about.
Children's bactus knits very quickly. Even without special knitting skills, you can easily knit a fashion accessory in a couple of evenings.
To knit a baby bactus “Rainbow”, you will need:
mercerized cotton threads ALIZE BAHAR 100 grams, “Rainbow” colors (color 1774);
knitting needles number 4.
There are several ways to knit baby bactus. The most common among craftswomen is knitting from corner to corner, adding loops to the middle of the bactus, and then decreasing to another corner. Knitting in this case turns out to be transverse. For me personally, knitting this way turned out to be not very convenient - calculating the length of the bactus is not always correct.
In addition, I tried to knit the bactus from the bottom corner by adding loops on both sides to the desired width. It is the addition that does not look very nice along the edge of the product, especially in the hands of a beginner.
Therefore, I will describe the following method of knitting a baby bactus, which I really liked, in more detail.
How to knit a baby bactus: job description
Cast on 270 stitches on the knitting needles in a single cast-on.
This will be the widest side of the bactus, its finished length will be about 95 cm. We knit the first row as for a 1x1 elastic band: one front loop, one purl loop and repeat this alternation until the end of the row.

We will knit a baby bactus with the simplest and most effective knitting method - “buckwheat 1×1”. This knitting allows the finished product not to curl and keep its shape neatly.
“Buckwheat” is knitting an elastic band in reverse. That is, if you see a knit stitch on a knitting needle in front of you, purl it, and if there is a purl loop hanging on the knitting needle, knit it knit. In other words, the knitting pattern differs from the elastic pattern by shifting by 1 loop. Everything is very simple.
This pattern is suitable for threads that have interesting colors and do not need to knit extra braids, holes, or weaves. It is enough to emphasize the spectacular color scheme with texture - and a children's bactus or any other product will turn out chic.
Using “buckwheat 1×1” stitch, knit 2 rows. In the third row we begin decreasing the loops. In order not to bother myself with special memorizations and records of knitted loops and rows, I calculated a convenient scheme: in each row the first three loops need to be knitted like this: 2 together, then return the resulting loop to the knitting needle, 2 together again, return the new loop to the knitting needle and last time 2 together.

Knit knit or purl according to the pattern. In short, we close each row by 3 loops from the beginning of knitting.

With this calculation, you will need to knit 90 rows (including knit and purl stitches). In such knitting, in principle, the front and back rows are not visible, they do not differ. Therefore, just knit according to the given pattern and do not bother yourself with calculations and notes. The decrease in loops will be uniform, and the angle of the bactus will be the desired size.
